
First, pick the fabrics you want to use.

You will need:
One piece for the inside. Cut: 7.5 inches by 6.5 inches
Two pieces for the main outside (from the same fabric, or different fabrics). Cut: 1 - 7.5 inches by 3.75 inches; 1 - 7.5 inches by 2.25 inches
7 pieces for the patchwork. Each cut: 1.5 inches by 1.5 inches.
ALL SEAMS ARE 1/4 INCH.
If you want to fussy cut your smaller squares: Cut out a piece of paper (I use card stock) 1.5 inches by 1.5 inches. Measure in .25 inches (1/4 ") from all sides, and mark lines parallel to the outer edge. Cut out a 1 inch square from the exact center (using the lines you drew). You now have a little window. Line up your window until you are happy with the design that shows in the center, and cut around the outside of the square.

Line up your 1.5 inch squares in the order you want to sew them. Sew them together. Press seams open. Then trim them down to 1.5 inch by 7.5 inches.

Here is the back of my patchwork strip. If one of your squares is off a little, that's ok. As long as you can still get a scant 1/4" seam allowance out of it.
Next we will piece the outside of the tissue cover together. Sew the 3.75 inch piece to the top, and the 2.25 inch piece to the bottom of the patchwork strip.


Press your seams away from the patchwork. Here is what my back looks like.

Square it up to 6.5 inches by 7.5 inches.

Place your outside and inside piece right sides together. Pin at the corners and in the center of the sides. Mark the center of one long side as your opening, and do not sew between those two pins. Usually 1.5 inches to 2 inches is enough room to turn your cover after you sew. Make sure to backstitch and the beginning and end.

Trim your corners like so: First cut the corner off as on the left corner in the picture. Then trim at an angle on both sides of the corner as on the right corner in the picture. Be careful not to cut through your stitches. Repeat so all of your corners look like the right one in the picture.

Turn your tissue cover right side out. Push out the corners. My favorite tool for pushing out corners is a crotchet hook. Press all your edges and corners so they are nice and flat.

One side will overlap the other when we sew this into the tissue cover. Decide which side you want to have on the outside, and that is the side you will fold in first.
Find the center of the rectangle and mark, or crease. Fold in one side so it overlaps the center by 1/4 inch. Fold the second side over so it overlaps the center on the other side by a 1/4 inch. You should now have a 1/2 inch overlap of the two sides. Pin in place.

Sew along each end with a scant 1/4 inch. You can add some extra personality to it by using a decorative stitch here. (This also closes your opening, and is why it is important that your opening is in the center of a long side of the tissue cover.)

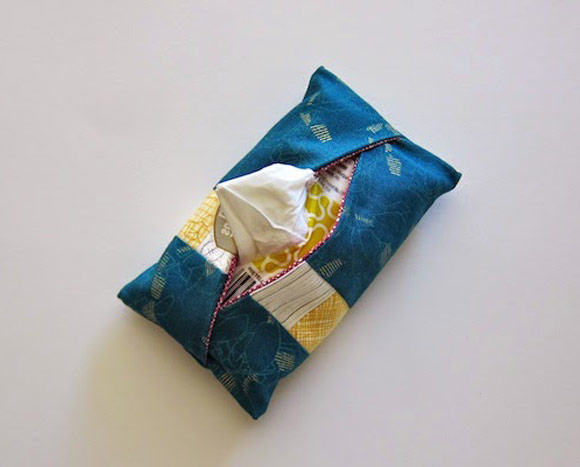
Turn your tissue cover right side out and your finished!! Or leave it as it as is.

The Front

The Back

Don't forget the tissues! ;)


Grazie 1000, x tutti i tutorial che condividi!
ReplyDeleteSempre stupendi!