
To make this bag, you're going to need: heavy weight canvas (about a yard, but it depends on how large you want to make the bag), scrap leather, a large piece of paper, pinking shears, regular scissors, two buckles, pins, thread, measuring tape, and a sewing machine.
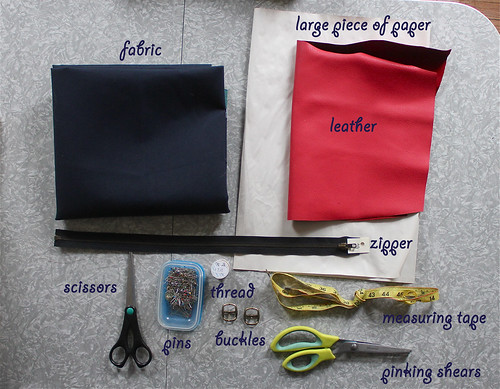
You can find scrap leather for very cheap by the pound at fabric stores; it comes in all different finishes and colors and is very cheap. You'll also need something in which to trace shapes on the fabric; tailor's chalk is best, unfortunately my dogs chewed it up the last time i sewed so i had to use a permanent marker.
You could also use chalk. just make sure that if you're using light colored fabric, you don't use a dark marker!

You need the paper to draw your pattern out on. I just take a whole ton of paper whenever i'm in ikea (by the registers) and it works perfectly. I want my bag on the large side, so i made it 24 inches wide by 14 inches long. Make sure that you don't cut on the seam of the paper!

Pin your pattern (with it still folded in half) to your fabric with the fold of the fabric on the fold of the fabric. Cut out the pattern twice.

Snip snip! you'll want to do this with pinking shears (if you have them) so that the fabric doesn't fray. If you don't have pinking shears, just add a little fray-block.

You should have two pieces of rectangular fabric left over, both the exact same size. Iron them so that they're nice and flat.

Grab a plate, large mug, anything round - you'll be using this to trace out a rounded shape for the edges of the bag. Put the plate on the corner of the paper so you're tracing about 1/4 of it. Cut the shape out when you're finished.

Trace the shape on to the back of the leather - you'll need four of the shapes. Use regular scissors to cut out the shapes.

It should look like this when you're done!

Place the leather shapes onto the fabric, both facing right side up. Carefully sew the piece down; if you're not that familiar with using the sewing machine, i'd recommend that you do this very slowly. You don't want wavy stitches! These will be the little corners on the bottom of the bag.

Here's what it should look like once all of the corners are sewn down. I added a little exterior pocket to mine. If you want to do this too, just cut out a rectangular piece of fabric and add a little of the leftover leather to the top as a trim. Top stitch it down.

Next, we're going to work on the leather straps. You first need to measure your buckles to figure out how wide the straps need to be. My buckles are 1" wide, so i'm going to make the straps .75" wide and about 3" long. You'll want to leave at least .25" of room for the straps to fit in the buckles. Trace two of these shapes on to the wrong side of the leather and cut them out with normal scissors.

Fold the piece of leather through the buckle and sew it down. Make sure that the straps are the same length - i had to trim mine a bit after this picture.

Sew the buckles down on the front of the bag, going over the stitch several times. To do this, you're going to want to make sure that the buckles are in the same spot. I made mine four inches from the side, and three inches from top. Pin them in place before you sew!

Next, we're going to cut the straps for the back of the bag. These should be a little longer, but the same exact width. I think mine were .75" wide and about 8" long. Use the same method that you did for the first set of straps; measure and trace on the wrong side of the leather and then cut out the straps with normal scissors.

Pin and sew the straps onto the back of the bag.

Next, we're going to cut the shoulder straps. These could be longer or shorter, depending on how you want your bag to fit. Mine were 1" wide and 23" long. You'll need two of these.
note: right before i put these straps on, i added a zipper to my bag. There's a lot of great tutorials online on how to sew on a zipper; i recommend checking craftster. Don't use one of those plastic zippers that you'd find of a piece of clothing. Get a heavy duty metal one.

Pin the straps down onto the bag like the picture above. You don't want the straps to cross over the bag, because then you won't be able to fit in large books and such. Measure where the straps should lay; these were 2" from the top and 7" from the side.
After you're done this, pin and sew the sides together with both wrong sides facing out. This is when you're actually assembling the bag. Be sure that you tuck in all of the straps and handles, you don't want to accidentally sew any in the seams! When you're done, turn the back right-side out and press. I made the holes for the straps at the very end; just mark little dots with a permanent marker on the wrong side of the back straps and use a knife to (carefully!) bore a little hole. I'm sure there is a much better way to do this but i didn't know how else to go about doing it.

Ta da! Here's what it should look like when you're done.


0 comment:
Post a Comment