
You need:
Fabric for bag outer
Fabric for bag lining
Coordinating thread
Cord (approximately 2 metres)
Spring Toggle
Chalk, scissors, needle and iron.

Option extras (for decorating the front of the bag)
Bondaweb
Fabric for applique shape
Embroidery thread
Step 1: Cut the fabric
Cut two rectangles of outer fabric so that they each measure 12″ x 17″.
Repeat for the lining fabric. You will now have four pieces of bag fabric.

Jump to Step 3 if you are not decorating your bag.
Step 2: Decorate the front of your bag
I wanted to decorated my bag with a Converse baseball boot but you can choose any shape you want…customise it to your dad; a.football boot, a baseball, cricket bat for example!
Trace or draw your shape onto the paper side of the Bondaweb – separating out the shapes that would need to be in different colour fabrics.

Cut around the shapes with a little space around each and, on the ironing board, place the shapes onto the back of your fabric scraps – those you are using to make the applique – with the paper side on the Bondaweb facing up.

Press for a few seconds until the glue on the back of the Bondaweb has fused to the fabric.

Cut out your shapes and peel off the paper Bondweb backing.
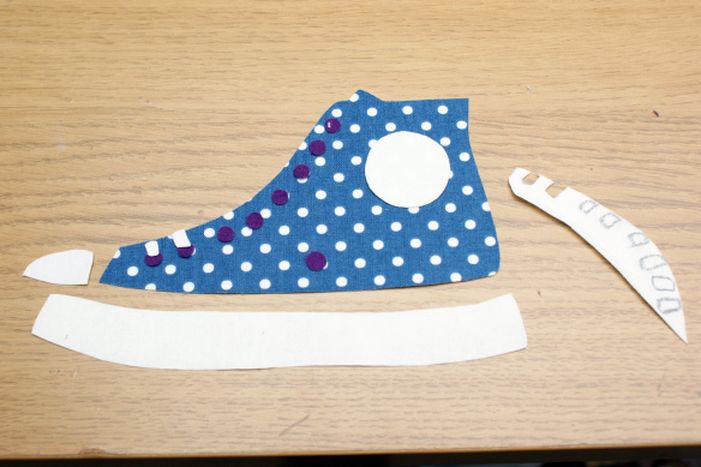

Place the shapes onto the front of a piece of outer bag fabric and press until they are fused to the bag fabric.

Using a small zig zag stitch in coordinating thread, sew around the shapes.

Tip: You may need to do the pressing and sewing of the shapes in stages if they require layering on top of each other. For example, I appliqued around my boot shape before pressing and sewing the eyelets on top, finally adding the laces.


Step 3: Sew the outer and lining pieces of the bag together
Once you have finished decorating the front of the bag (if doing so), place a piece of lining fabric, right-sides (patterned-sides) together, on top of a piece of outer fabric.

Pin across the top.

Using approximately 0.5″ seam allowance, sew across the top, removing pins as you go.

Repeat for the other piece of lining and outer fabric, and press open the seams.

Step 4: Make and attach the cord tab.
Cut a piece of fabric 2.5″ x 5″ – you can decided which fabric you choose to use – I decided to use a piece which matched the bag applique.

Fold length-ways so the right-sides (patterned sides) are together. Pin.

Sew along the short side. Press open the seam and turn the right way out. Press so the seam in central.


Fold this tab in half and pin to the right-side of the front bag outer, approximately 1.5″ up from the bottom. Sew in place.

Step 5: Sew the bag together.
With right-sides together, lay the two bag pieces on top of each other, matching up the centre seam, so the lining pieces and together and the outer pieces are together. Pin all around the edge.


Mark the cord channel: On the side of the bag where you have sewn the cord tab, measure 1.5″ from the seam line and make a small mark on the outer pieces. Repeat on the lining pieces – this 3″ space will be left un-sewn to create the channel for the cord.

Starting at the bottom of the lining , using a 0.5″ seam allowance, sew all around the bag, leaving a gap between the marks you made for the cord channel, and stopping about 1.5″ from where you started, stay stitching at the start and end.

Press the seams open around the cord channel.

Clip the corners and any excess fabric.

Turn the bag the right way out through the opening you made at the bottom of the lining piece.

Tip: Gently poke the corners out with a pencil.
Press the bag and hand-sew closed the opening in the lining.

Step 6: Finishing
Push the bag lining into the outer and press.

Match up the cord channel opening. Sew around the top of the bag so the line of stitches runs under the cord channel opening.


Attach a safety pin to one end of the cord and work the cord through the cord channel, through the the spring toggle, down through the cord loop at the bottom of the bag, up through the spring toggle again to meet the other end of the cord.


Secure the ends of the cord by tying in a knot and work the cord around so this knot is hidden in the cord channel.


I use the term ‘shoe’ bag loosely as it is a very versatile bag and can be used to contain anything you like. You may also want to glam this bag up…use floral fabrics instead of spots and add a high heel instead of a baseball boot…to give to the ladies in your life.


0 comment:
Post a Comment