
• 6, 2 1⁄2" squares of assorted prints
• 2, 6 1⁄2" x 2" rectangle of linen
• 1⁄8 yard medium weight fusible batting
• 6" zipper
• 1⁄8 yard lining fabric
• 1⁄8 yard of fusible interfacing
• 2, 1 1⁄2" squares of assorted prints fussy cut for additional
decoration (optional)
• Temporary marking pen
• Neutral thread
• Dark brown thread
• 2" strap of leather for tab (optional)
• 2" lobster clasp (optional)
GOOD TO KNOW
• Finished size is approx. 6" square.
• Measurements include 1⁄4" seam allowances.
• Sew with right sides together unless otherwise stated.
• Finished size is approx. 6" square.
• Measurements include 1⁄4" seam allowances.
• Sew with right sides together unless otherwise stated.

TO CUT
Lining fabric:
– Cut 2, 6 1⁄2" squares
Medium weight fusible batting:
– Cut 2, 6 1⁄2" squares
Fusible interfacing:
– Cut 2, 6 1⁄2" squares
TO SEW
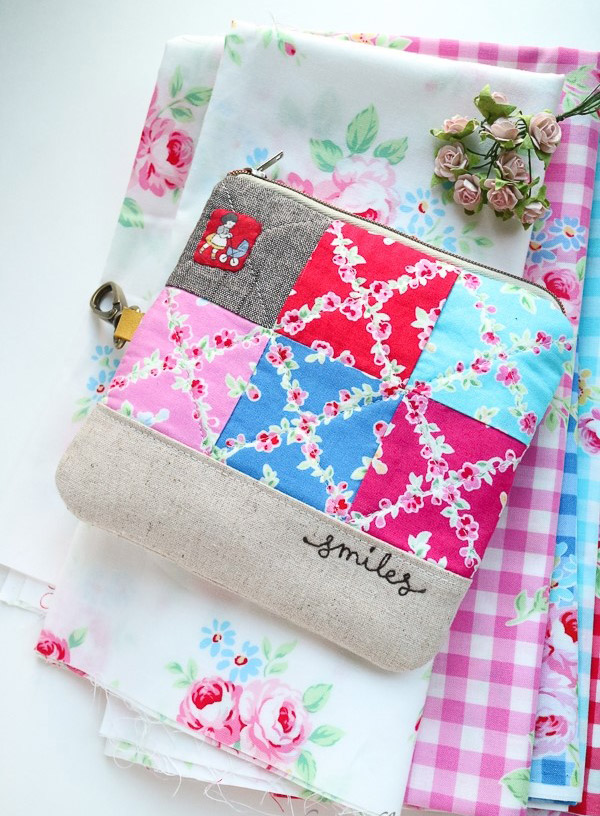
1. Lay the six assorted cotton print squares out in two rows of three squares and sew together. I find it easiest to stitch together one set of three, then the other and press seams. Then sew the two rows together along one of the long edges. Press.
Lining fabric:
– Cut 2, 6 1⁄2" squares
Medium weight fusible batting:
– Cut 2, 6 1⁄2" squares
Fusible interfacing:
– Cut 2, 6 1⁄2" squares
TO SEW
1. Lay the six assorted cotton print squares out in two rows of three squares and sew together. I find it easiest to stitch together one set of three, then the other and press seams. Then sew the two rows together along one of the long edges. Press.

2. With RST, place the 6 1⁄2" x 2" linen on top of your pieced section, matching the long edges, stitch. Then sew the 6 1⁄2" x 4 1⁄2" min print and the remaining 6 1⁄2" x 2" linen together for the pouch back.

3. Fuse the fusible batting on to the wrong sides of the pouch front and back, quilt as desired. I created a cross-hatch pattern on the printed fabrics, making sure to use the corners of squares as a guide on the front. For the back you may wish to draw the lines on using a temporary marker. For the linen section I simply topstitched along the edge of the seam.

4. Optional. In your own hand and using a temporary marker, write the world ‘smiles’ on the front linen piece on the right hand side. Using free hand embroidery, stitch over the letters with dark thread.

5. Attach the 6" zipper. Place the zip with the head facing down onto the pieced front and the head of the zip on the left side. Align the edge of the zip tape with the top edge, baste into place if desired. Open the zip slightly, then place one of the lining pieces, with the right sides facing in, sandwiching the zip in between. Using a zipper foot sew along the top edge using a 1⁄4" seam allowance. Fold the lining back around so that the lining and the outer are facing wrong sides together, press along the seam taking care not to the melt the zip. Repeat for other side.


6. Open the zip halfway. Pull the outer and lining fabrics away from each other and place them so that the two lining pieces are together, with the right sides facing and the same for the outer fabrics. Round off the lower corners of your outer and lining pieces. With your normal machine foot, sew around the outside leaving a 3" gap in the bottom edge of the lining for turning through. Optional - before sewing up the left side of the pouch, insert the leather strap with lobster clasp folded inside, then continue sewing.


7. Turn the pouch right side out through the gap and press into shape, poking out the corners. Hand stitch the gap closed

8. Optional. Attach 1 1⁄2" square of red cotton print by hand for additional detail. I fussy cut a print depicting a little girl but you could cut a design of your own choosing. I also attached a yellow square on the back. Use a slip stitch to secure in place.


VERY VERY NİCE,BRAVO :)
ReplyDelete