
So, I ran into a little problem. It turns out that, when making a tutorial, I'm not so great at remembering to take pictures! I guess this is really more like a cross between a process and a tutorial. Hopefully it's somewhat helpful.

Finished Size: 20"
Sewing Style: Foundation Paper Pieced
Labour Level - Best Friend Status
Skill Level - the tutorial assumes you already know quilting basics, problem solving, and how to use a foundation pattern.
Supplies:
Courthouse steps template - 9 copies
20" pillow form
thread
22" square batting
Fabric:
Nine 1" squares
Dark Fabrics: 8 prints each at least 1" x WOF
Medium Fabrics: 8 prints each at least 1" x WOF
Light Fabrics: 1-20 prints each at least 1" x WOF
Inside border (solid): two strips 16.5"x1", two strips 17.5"x1"
Outside border (solid or print): two strips 18"x2", two strips 20"x2"
Backing: Depends on the back you choose. I used made an envelope back and used one piece 20"x15" and one piece 20"x10".
Step 1: Choose Fabrics
You will need four fabrics per block. The general idea is to have a light background, dark "star points," and medium corners. I'm not the best with values so my dark and medium run a rather blurry line.

The very astute will notice that I didn't use many of the fabrics in my picture. Once I got going, I realized that some just weren't working for me. Pretty common among, quilters, I think!
Once you have an idea of the fabrics that you want to use, you can either cut all your strips up front or cut as you go. I cut all my strips up front but didn't use a lot of them. No biggie - they are perfect for string quilts.
Here are my strips after they were cut.

Step 2: Construction
Hopefully you downloaded the template that I made. And hopefully it works for you.
The first thing you'll need to do is decide where your fabrics are going to go. I marked the location of the light, medium and dark fabrics in the following grid.
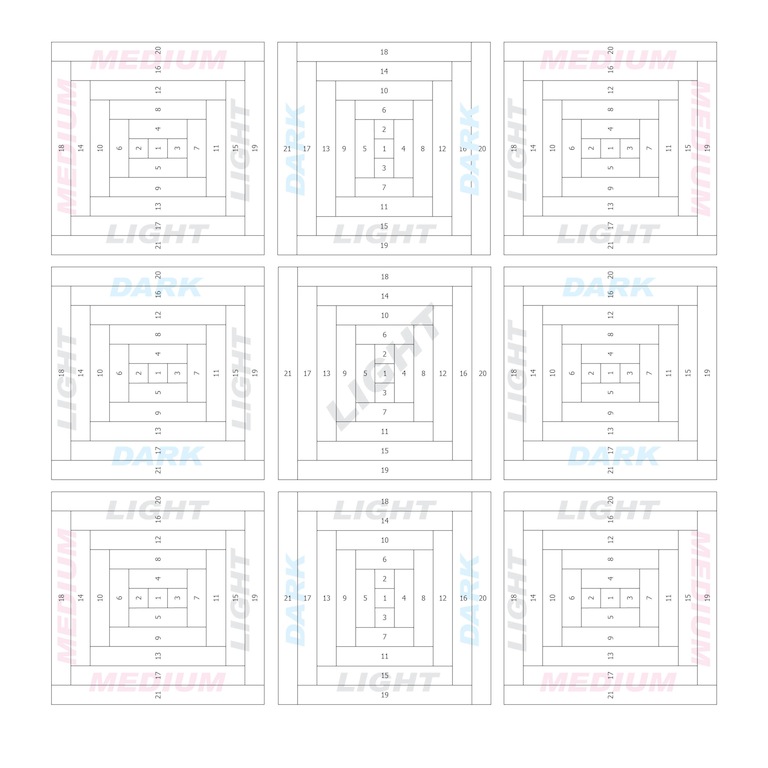
In my pillow, I used one print per section but you could certainly make it more scrappy by mixing up your lights, mediums or darks. But make sure to keep lights with lights and darks with darks, etc.
Group your fabrics into sets according to which are going to go in each block. Then start with whatever block you want. I sewed all the outer blocks first and the center block last. But it really doesn't matter. I also chose my combinations as I went.
If you are using regular printer paper, make sure to set your stitch length to something very small. I go down to at least 1.8. This makes it much easier to rip the paper off without pulling out stitches.

This is the first place that I forgot to take pictures. But, since each strip is numbered, it should be fairly straight forward.

Place your 1" square, right side up, over position "1" on the back side of the template. Then, allowing for 1/4" seams, place your medium print right sides together with the square and sew along position 2. Trim and press the position 2 strip. Your light print goes over position 3, then a medium over position 4, and so on. follow the order, paying attention to the light and medium and the block should turn out fine. I use an "add a quarter ruler" to trim every seam allowance and also press each seam. I would make a comment about being type A but I'm really not. I just like flat blocks ;)
Once all your blocks are sewn, remove the paper

You will be left with these:

Lay your blocks according to the chart then sew them together in rows.

Pressing the seams open, as you go

Now choose your 1/2" inner border. Here are some of the colours that I tried before settling on the turquoise Moda Crossweave.

The inner border uses the 1" wide strips for a finished size of .5". If you want to make a larger pillow, this would be a good spot to increase the size. Plus, a larger pillow would allow more of the borders to be viewed, which I think would look very nice.
Sew the shortest border strips to two opposite sides. Press the seams toward the border then sew the other two strips and press towards to the border.
Next, choose the outer border. I spent a lot of unnecessary time choosing this fabric! You can barely see the border in the finished pillow! If you are going to make a larger pillow, by increasing the border width, then you should probably spend time choosing the fabric. If not, just choose something that looks ok, but don't worry about it.
Here are some of the fabrics that I tried:


Step 3: Quilting and Assembly
Once the outer borders are attached, square up your pillow to 20". Do as I say, not as I did :) Sandwich your pillow top, just like you would any other quilt - spray or pins.

And quilt it it. I used random straight-ish lines.


In the original pattern - there was an appliqued flower in the center of the pillow. Applique is not my strong suit but I remember loving the look when I saw it. I really can't remember what the flower looked like, now. So I attempted to come up with some ideas. None of them made the cut. In the end I decided that I liked the pillow naked compared to my sad attempt to put something in the center. If I was to do this over, I might consider a dark center for the pillow. But I plan to keep playing with the applique.
Square your top to 20" then make the back of your pillow.

Turn the pillow right side out and stuff with your pillow form.

I really love this pillow and hopefully you, or whoever you make it for, will love it too.


0 comment:
Post a Comment