
Make the most of pretty prints with this simple and stylish tote bag.
Fully lined and with the addition of interfacing make this daily essential durable too! Perfect Tote Bag Tutorial.
Materials
- 25cm x 112cm (long quarter) of fabric A. We have used – Dandelion by Brie Harrison at Dashwood Studio (SFGN 1089)
- 25cm x 112cm (long quarter) of fabric B. We have used Daisy Spot by Brie Harrison at Dashwood Studio (SFGN 1093)
- 25cm x 112cm (long quarter) of fabric C. We have used Yellow Fern by Brie Harrison at Dashwood Studio (SFGN 1094)
- 74cm x 82cm of fabric D – Cream cotton for lining.
- Vilene F220 Fusible Interfacing
- 180cm Bias Tape
Good To Know
- Use 1cm seam allowance throughout
- Finished bag measures 35cm x 38cm (excluding handles)
To Cut
Fabric A:
– Cut 2, 25cm x 37cm pieces
Fabric B:
– Cut 2, 5cm x 37cm pieces
– Cut 2, 15cm x 37cm pieces
Fabric C:
– Cut 2, 7cm x 45cm pieces
Fabric D:
– Cut 2, 41cm x 37cm for the lining
Interfacing:
– Cut 2, 7cm x 45cm pieces
– Cut 2, 41 x 37 pieces
To Sew
1. Create the outer panels
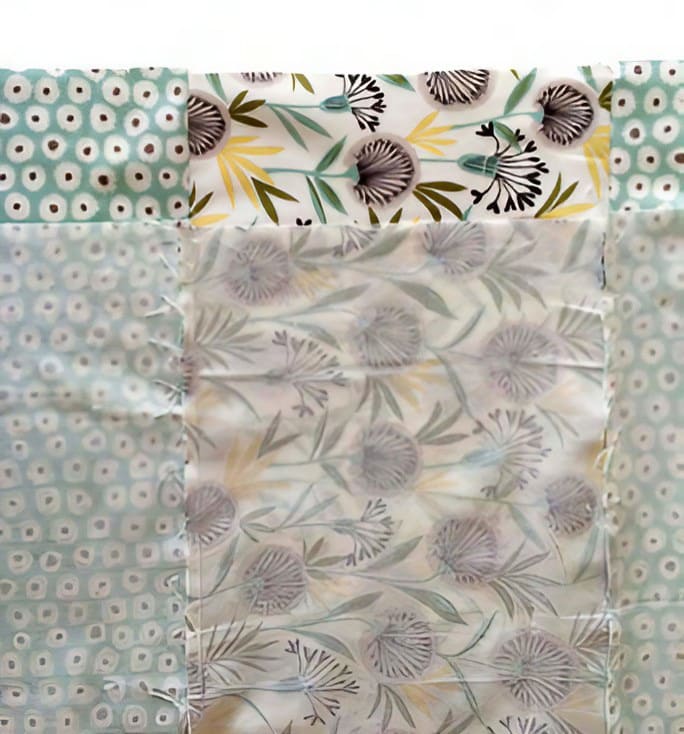
Working on the front and back in turn, place the thinner Fabric B strip along the upper edge of Fabric A, pin and stitch in place with a 1cm seam allowance. Position the larger Fabric B strip along the lower edge of the Fabric A strip and pin in place. Join with a straight machine stitch taking a 1cm seam allowance. Repeat to create the back panel in the same manner.
2. Add topstitching
Neatly press the seams downwards and with a straight machine stitch and working close to the fabric join, stitch a line of topstitching along the join to hold the seam allowance in place and add decoration. Repeat on the two seams on the back panel and set aside.

3. Create the straps
With a warm iron fuse the interlining on to the wrong side of the Fabric C strip, set aside to cool and allow the adhesive to bond fully. Repeat to the second strip. The interfacing will provide added strength to the straps.

4. Complete the straps
Fold the Fabric C strips in half aligning the long sides and press neatly in place. Trim the binding into four equal lengths, fold and press neatly around either side of the fabric strip – this will secure the raw edges. Pin in place and sew with a straight machine stitch, ensuring both parts of the tape are fully secured down each side. Repeat to create the second strap in the same manner.

5. Secure the straps
Working on each tote bag panel in turn, position the straps on the upper edge, aligning the raw edges of the straps with the raw upper edges of the fabric. Ensure that there are no twists in the strap and pin neatly in place. Join to the bag with a straight machine stitch taking a 5mm seam allowance. Repeat to add the second strap to the remaining bag panel in the same manner.

6. Create the lining
With a warm iron and pressing cloth, fuse the two larger pieces of interlining to the wrong sides of the Fabric D to create the lining. Allow to cool fully to ensure that the adhesive has bonded to the fabric.
7. Secure the lining
Fold and pin the straps onto the right side of the bag front panel, so they are out of the way of the next step of stitching. Position the lining onto the main fabric with the right sides facing and pin in place. Join with a straight machine stitch taking a 1cm seam allowance. Repeat to add the lining to the other bag panel in the same manner.

8. Complete the bag
Position the two bag panels together with right sides facing, ensure that the seams joining the fabrics are neatly aligned, pin in place. With a straight machine stitch and taking a 1cm seam allowance, join the two pieces together with a single consecutive seam, ensuring to leave a 10cm gap along the lower edge of the lining fabric section to turn through.
9. Turn through
Carefully clip the seam allowance along the corners and turn the bag through to the right side through the opening in the seam allowance. Neatly press the seam allowance along the gap to the inside and secure with a line of stitching. Press the bag neatly before pushing the lining into the inside of the bag – ensure that the corers are fully pushed out and neatly press along the upper edge seam that lies around the opening of the bag to finish.


0 comment:
Post a Comment