
We will be making a Pieced Star today. There are many variations to a pieced star.

I chose this one because it has the flying goose unit AND half square triangle units (a great review of how to make half square triangles).

Start with two fabrics cut into the following pieces:
Fabric 1 (Tan): Four - 4" squares, Four 3 1/2" x 6 1/2"
Fabric 2 (Cream): Four 4" squares, Eight 3 1/2" squares

Mark diagonal lines on the back of all of the cream squares: Four 4" squares and eight 3 1/2" squares.
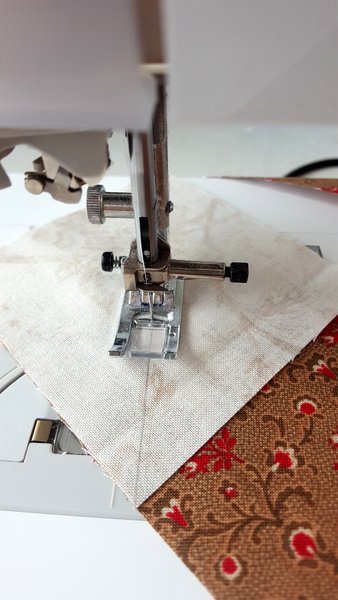
We are going to start by making the flying geese. This should also be a review if you've been sewing along with us. Place a 3 1/2" cream square on the corner of the 3 1/2" x 6 1/2" tan rectangles. Stitch on the line.

Trim 1/4" from stitching to remove the corner.

Press toward the corner.

Place another 3 1/2" cream square in the opposite corner of the 3 1/2" x 6 1/2" tan rectangle. Stitch on the line.

Trim 1/4" from stitching to remove the corner.

Press toward the corner. Repeat to make four flying geese.

Now we are going to move on to the half square triangles. With Right Sides Together (RST), place a 4" marked cream square on the 4" tan square. Stitch 1/4" from the marked line.

Turn the square around and stitch 1/4" from the other side of the marked line. Repeat for all 4 squares.

Cut on the line.

Press the half square triangle toward the tan fabric.

Trim two sides of the half square triangle, making sure to put your ruler's diagonal line on the seam.

Trim the remaining two sides. Trim to 3 1/2" x 3 1/2". Repeat to make sixteen half square triangles.

Lay out all of your units to make your block.

Stitch the four center half square triangles together to make a pinwheel.

Press the pinwheel. Doesn't matter which way your seams go on this one.

Now your pieces should look like this.

Stitch the three rows together.

Press the rows. Again, it doesn't matter which way you press as long as they are going opposite of the adjacent row. I pressed the top and bottom rows to the center, and the middle row to the outside.

Here are your three rows ready to be put together.

Stitch the rows together and press. Finished block. Isn't it beautiful?

If you made blocks like this for an entire quilt, you might get something like this. It basically looks like a square in a square, alternated wtih pinwheels.

But if you added sashing, it might help you to see where the block actually stops and starts.

Of course, if you did a scrappy pieced star, you could definitely do it without sashing and it might look something like this.


Thanks for the tutorial.
ReplyDelete