![кошелек своими руками. Bright purse. Sewing instructions кошелек своими руками. Bright purse. Sewing instructions](https://blogger.googleusercontent.com/img/b/R29vZ2xl/AVvXsEhVkBiKHb-qhxiMcHy7koMk8X_ZOQpelubIYajVe00R54PfX4Nz2ut_OufH-zRiUf-UQaX9YJyYRBLSNjnfHg_eTyzN-uQcZqhnofaWllVhhn9TNnPfZWEKWaXcljby9wLDo8E9vR1_HKGN/s1600/1122.jpg)
To do this, you need a piece of cotton fabric with polka dots 26x28 cm in size, a piece of cotton fabric with the image of owls measuring 26x26 cm, non-woven fabric, synthetic winterizer, Velcro and scissors.
![кошелек своими руками. Bright purse. Sewing instructions кошелек своими руками. Bright purse. Sewing instructions](https://blogger.googleusercontent.com/img/b/R29vZ2xl/AVvXsEi4a9Y2fKEqO82aRTuo9OLeCe1JRepN2F6qS1wVdibxK8-kyEicGBhKCp16Y4cq237eErlrhyEb8kSNiZJDU_0LUctyP4RoMaf6ZC1Fw8Mb071TLtLJ4tx06iLcFqqt6EX49Gh2e8r_z1QC/s640/1107.jpg)
The wallet consists of four parts. Their sizes, taking into account the allowance for seams, are shown in the diagram.
![кошелек своими руками. Bright purse. Sewing instructions кошелек своими руками. Bright purse. Sewing instructions](https://blogger.googleusercontent.com/img/b/R29vZ2xl/AVvXsEgZKIGflLN2uG_WBM_ky-PriooyjzR88z0hJ3C_wTxh-HrkGCQKpwPBEmA176IFD08CKR6huCxaig9x977hjsSkWm8nn9fDNkO2WiPNR77ZIvmK6vuT3bVNH7y8Hj1xUtcjD7oKH-9XysX8/s1600/1108.jpg)
From fabric with polka dots and fabric with the image of owls cut out two rectangles of size 26x10, as well as details of pockets.
![кошелек своими руками. Bright purse. Sewing instructions кошелек своими руками. Bright purse. Sewing instructions](https://blogger.googleusercontent.com/img/b/R29vZ2xl/AVvXsEiEgHjqEeTXrva_Whuf1EcGPNrsQLXvR0T6kNqAyyB-_3P-_xcgwVw4TuPWOXZpJx6axGaCD_6WhcPV4LtcZf8Ihg2eQViBfdt9rL-VBgHV-dDPaVXbdSR6I8vYwCWvZgn4sh2IlMrpXiaO/s640/1109.jpg)
![кошелек своими руками. Bright purse. Sewing instructions кошелек своими руками. Bright purse. Sewing instructions](https://blogger.googleusercontent.com/img/b/R29vZ2xl/AVvXsEg6syhHVcGWPom4t33vPKhyphenhyphen0Tatkl3XYUymmMbcxbackYeZp90EhmEEAsd_ssfjHquc-f4IzMHXDWYtJwBUwa74bw_Q9NhHkUefwHT355K6I53ixC2OM4CLsS7MgeJwt5vTogn65VtWRy4A/s640/1110.jpg)
Strengthen each part from the wrong side with non-woven fabric.
![кошелек своими руками. Bright purse. Sewing instructions кошелек своими руками. Bright purse. Sewing instructions](https://blogger.googleusercontent.com/img/b/R29vZ2xl/AVvXsEhI6tL1e5LJg9jKypFiIvMyJQ_k_jUoFcH5Lio1PnH7SAi00FSbvS2NzPIS_-YThNWBkqmv6fsFajd0r6oWB6JMdHVrqBlYKqwIR8Gbh44ndFfUqoJK8-xenGymaCcbaLvET5fz-xq4Rpo8/s640/1111.jpg)
Fold the pocket part along the fold line (yellow dotted line), iron and, stepping back from the edge a few millimeters, lay a straight line.
![кошелек своими руками. Bright purse. Sewing instructions кошелек своими руками. Bright purse. Sewing instructions](https://blogger.googleusercontent.com/img/b/R29vZ2xl/AVvXsEiR06W-h8P-rVfDLJ2NSTVoc1kjdWmTQ2GPKmT4erFqyiRcjkvUGHS0sohAbxcCkr4Fg2csf6DS2CzKijLId7W2tNY9Y07Ney9dRGwj3RnpoAEXYbJg4WNhA895tI7V1LGsxz_uysqeiBRd/s640/1112.jpg)
Similarly process the second pocket.
On the pocket part No. 1, lay a pocket with the image of owls, aligning the lower sections.
![кошелек своими руками. Bright purse. Sewing instructions кошелек своими руками. Bright purse. Sewing instructions](https://blogger.googleusercontent.com/img/b/R29vZ2xl/AVvXsEgKiwgOYvBiTJOhxbEcCyordo1CgNv3FlxtEAEzKdK1HZSYS8_0VtDUc6C0NtAFPqc2nA6VEgchYeA7euKOK-2opyWpsXAdSLu5SHRu4BCDjGckzocjLGJKpe3ANN48rMoeslXZki1uzWcQ/s640/1113.jpg)
In the middle of the parts, lay a straight line, thereby connecting the two blanks together and making compartments for cards.
![кошелек своими руками. Bright purse. Sewing instructions кошелек своими руками. Bright purse. Sewing instructions](https://blogger.googleusercontent.com/img/b/R29vZ2xl/AVvXsEg_ZGWkgf3CLaGEp8XpAxlaSzj93llHHb3f0ZL6X1Gpf0HZCNDEDW05x0Gmee02F00SGYvgWBz-Y4enhVmTGja5MvD51Lfa85hSW6uYi4Fx5Xvgrreee2P0bT8RZkOb-U-6h4QfSMBkMTt5/s640/1114.jpg)
Stepping away from the edge of 1 cm, sew on Velcro to the pockets.
![кошелек своими руками. Bright purse. Sewing instructions кошелек своими руками. Bright purse. Sewing instructions](https://blogger.googleusercontent.com/img/b/R29vZ2xl/AVvXsEhRuQiWK1uhSOmMbvioGiNaJpwQwiE9e5jSyIRVjPNd2r1Zzp-SQ6hEgAtwolfaGnxmyy_YLNAY90gVD6nzN5Ofj7QM4GiuyvY5mwMcAfrOXqeuT0DUh2khLiHRanJlumMj6CRAe9JARmGC/s640/1115.jpg)
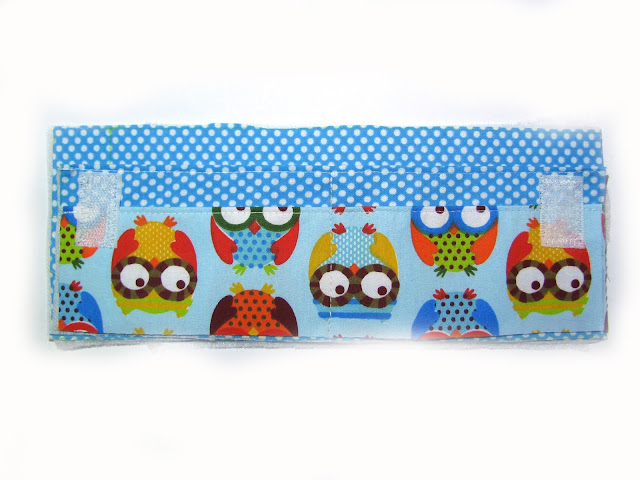
Now lay the pocket detail on the lining, aligning the lower sections.
![кошелек своими руками. Bright purse. Sewing instructions кошелек своими руками. Bright purse. Sewing instructions](https://blogger.googleusercontent.com/img/b/R29vZ2xl/AVvXsEins1mq2BmqEN5TFDazFUApmP6Lls8b5FmTLNacp_QLApruRE5-gtleLtIAb7_DjQ_zewsEScsxveoOFfNPXsLnrLD27ob3JgJ0aRo1x2htufBnzwBn1bULAeUWxYWmCqZvWpx2jmfSIalj/s640/1116.jpg)
If a thin non-woven fabric is used in the work, in this case, to give the product rigidity, a sintered sintepon can be glued to the wrong side of the lining.
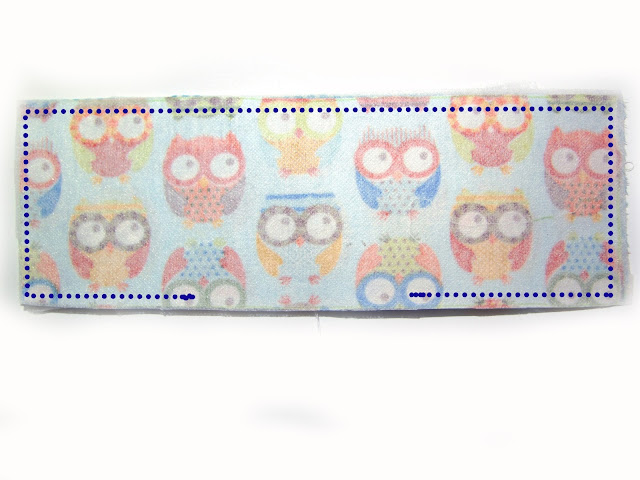
Cover the workpiece and lay a straight line around the perimeter, leaving open a small hole that you will need to turn out.
![кошелек своими руками. Bright purse. Sewing instructions кошелек своими руками. Bright purse. Sewing instructions](https://blogger.googleusercontent.com/img/b/R29vZ2xl/AVvXsEilR-Us44lrka8NP18hR_aDb1YnwgAyX_KRwYnvvsBQUByWF4mplXC1NKfoTEzKK2O1XtYdzd4FBh3yDZtQk5orCFNPX1VBr7dzotRILkIgzdSUFgYHu7rw2DdqMAACCoOLtZ-NzUWQlWYu/s640/1117.jpg)
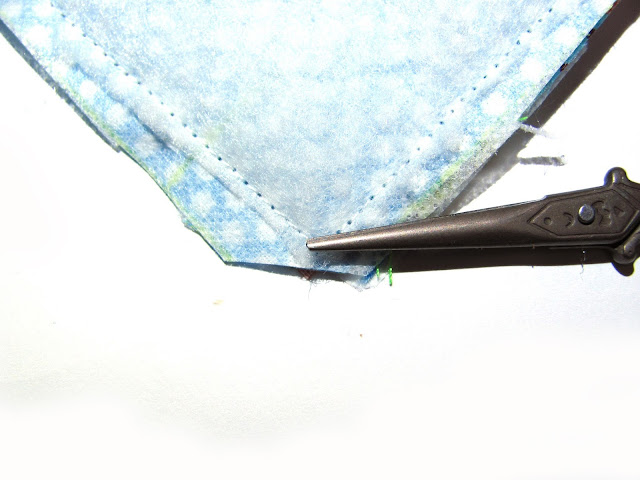
Cut the synthetic winterizer with sharp scissors from the outside of the seam. Also, obliquely cut the corners of the wallet.
![кошелек своими руками. Bright purse. Sewing instructions кошелек своими руками. Bright purse. Sewing instructions](https://blogger.googleusercontent.com/img/b/R29vZ2xl/AVvXsEg_TwcK1Sj0L8Z7wy1cmqkM36i0cVAPuN2o_DcbQxN4Cy6Siub-X9yNyE30335RmW51ZgSmYmebN1bV2Wu-GLRZ8SEYUXB8pwg9V1XAkvUgzDU1L_lU3grm0tRv0BycBnZrrTFJTjFd1-zt/s640/1118.jpg)
Turn out and iron the wallet.
![кошелек своими руками. Bright purse. Sewing instructions кошелек своими руками. Bright purse. Sewing instructions](https://blogger.googleusercontent.com/img/b/R29vZ2xl/AVvXsEhW8VCIViYfgnS1sV-ZPOrP5RNjMM0diV4CdsDNu_yg1hpZpSt1_X85ZR3_NVIz0zXohIXB_iqLml-tjaYCupW2vukzOnfGOFx1uUby51puebIUgL5B0YKfIq_lllwTOPMqCUczdd4Cb0Nb/s640/1119.jpg)
At the end of the work, it remains to lay 4 seams: one around the perimeter of the wallet and three in the middle, with an interval of 2-3 mm.
![кошелек своими руками. Bright purse. Sewing instructions кошелек своими руками. Bright purse. Sewing instructions](https://blogger.googleusercontent.com/img/b/R29vZ2xl/AVvXsEgbSHwi1W5A2L5WUJjj_evbpXZcYdbejHpCpNLKjtN1fOsueMXtpUbpsKrO4TgCI7xpBgGu0-2H_jLK6HNJR_qOAHqaqnbRS2EpXC_h1ql6llIYnRrLEnoryax4wkOEqJVfVkucxmwauhEp/s640/1120.jpg)
The wallet is ready!
![кошелек своими руками. Bright purse. Sewing instructions кошелек своими руками. Bright purse. Sewing instructions](https://blogger.googleusercontent.com/img/b/R29vZ2xl/AVvXsEhxH9EcPPdT9r0ijvQmLx35Hxleb67qdussgSqB12m84uMfSdr6aTVB_8SYCnSQnlE65u7QNfFFaFsA33XvCGrkvj7XsXUK-K1O2V21rAHAupKT6a0Skm4LkYn8eUw27iC6sg2uAy4OyrJy/s1600/1121.jpg)
0 comment:
Post a Comment