
It's simple enough for a beginner, even with a zipper involved! I take you through step by step with very clear instructions. This simple clutch is classy and clean, perfect for everyday use. It measures 10.5” across and 5.5” tall (when folded over) and 9” tall when open.
It features a small interior pocket.
This tutorial is created with the BEGINNER in mind. Someone who has completed a few simple projects will be able to complete this bag.
Supplies
1/2 yard exterior fabric - medium weight/home decor fabric works well
1/2 yard interior lining fabric - quilting cotton works well
1/2 yard medium weight fusible interfacing -I recommend Pellon #808
1/2 yard flannel for interlining
1/4 yard vinyl or leather
12" metal zipper
Coordinating thread
Ruler and/or yardstick
Fabric marker or chalk
Scissors
Sewing pins
Sewing machine
Fabric circle cutter (optional)
Printing Instruction
1. Page size is 8.5" x 11". Select File - Print.
2. Set page scaling to "none" or 100%.
3. Press "Print." (Or, to save paper and ink, just print the pattern pieces.)
Assemble pattern pieces
Pattern piece A spans two pages, so it will need to be cut and taped together according to instructions on the pattern piece. Simply cut pattern pieces В & C.
Cutting instruction
Lay pattern pieces onto fabric and, using a fabric marking pen and ruler, trace and cut.

Download the free PDF Sewing Pattern

For circle piece, trace pattern piece C onto vinyl and cut. If using a fabric circle cutter, create 6" circle.

Measure 3" into circle to find center and cut in half lengthwise. Then measure 3" into each half and cut so you have 4 egual pieces. A rotary mat and cutter is very helpful for this step.
For vinyl zipper pull, cut a thin strip of vinyl measuring 1/4" by 10". Trim one end of strip on a diagonal.

Apply interfacing
Apply medium weight fusible interfacing to both exterior pieces A, following manufacturer's instructions.
Tip. If using Pellon #808, as recommended, the shiny side of the interfacing should be applied to the wrong side of the exterior piece using a hot iron on steam setting.

Once interfacing is applied, fold down one long edge 1/4" and press. Repeat for both exterior pieces.

Place interior lining on right side up on top of flannel piece, matching up edges.

Fold down one long edge and press. Repeat for both lining pieces.

Attach vinyl corners
Place vinyl pieces onto bottom corners of exterior pieces (top edge of exterior piece is folded).
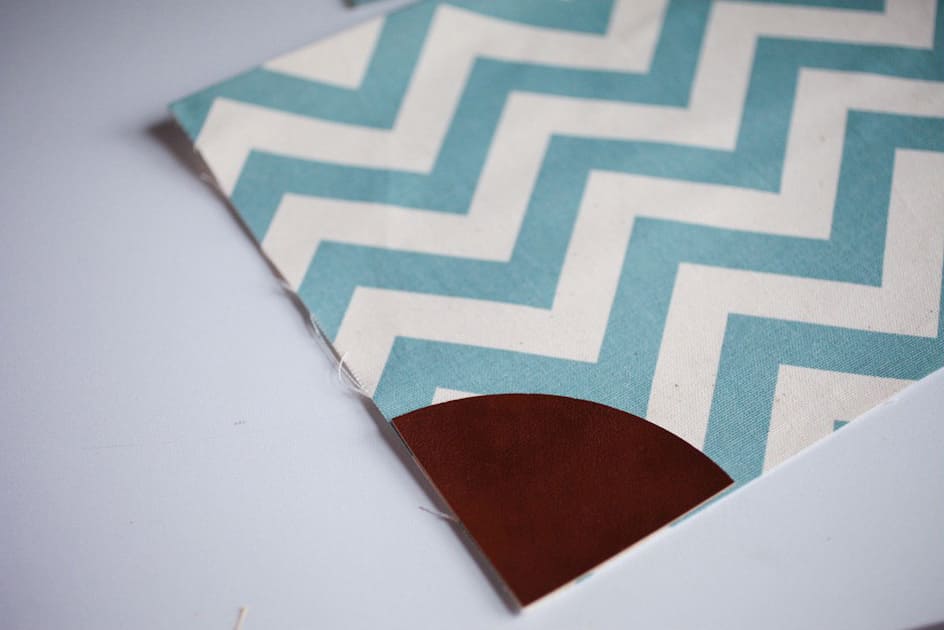
Set stitch length to 3 or longer and thread machine with thread that matches vinyl.

Using 1/8" seam allowance, topstitch the curve of vinyl piece onto exterior piece.
Tip. Do not pin the vinyl pieces to the comers as the pin holes will be visible. Instead, hold vinyl onto fabric and sew slowly.


Repeat for all four corners.

Create interior pocket
Place pocket pieces RIGHT SIDES TOGETHER and pin.

Set stitch length to 2 (or a standard stitch length on your machine).

Using a 3/8" seam allowance, stitch around the edges of the pocket, removing pins as you go. On one long edge, leave 2-3 inches not sewn. You will use this opening to turn your pocket.
Clip corners, being careful not to cut into your stitch line.


Turn your pocket right side out, push out corners, and press.

Attach pocket
Using a coordinating thread, stitch 1/8" from the top edge of your pocket (this is the opposite edge from the opening).

Find the center of your lining piece by folding in half and creating a crease at the bottom of your lining piece. Folded edge should be at the top. Pin pocket, stitched edge at the top, 1.5" from bottom edge.
Topstitch pocket on sides and bottom, leaving the pocket open at the top.


(Optional) If adding a fabric label for your business or shop, stitch it onto the top edge above the pocket.

Attach interior pieces to zipper
Place top folded edge of lining piece onto UNDERSIDE of zipper, with zipper pull to the left (as shown).

Tip. Pinning onto your zipper tape is optional. I find it easier to hold the fabric onto the zipper tape and sew slowly. Be careful not to stitch too closely to metal teeth and break your needle.

Beginning on top right corner of lining piece, stitch folded edge of interior lining piece (with flannel underneath) to zipper tape, using 1/8" seam allowance.

Repeat for other lining piece.
Tip. For second lining piece, it may help to unzip the zipper half way, stitch a few inches, then zip it up to finish.

Attach exterior pieces to zipper
Flip over your lining pieces so the flannel is exposed and the zipper is RIGHT SIDE UP.

Place folded edge of exterior piece onto zipper tape and top-stitch, using 1/8" seam allowance.

Tip. Try to sew as closely as possible to zipper without sewing into metal teeth. This step may take some practice. Depending on your machine, it also may help to use your zipper foot for this step.

Repeat for both exterior pieces.

Pin bag together
Once exterior pieces are stitched onto zipper, unzip zipper halfway.

Place exterior pieces RIGHT SIDES TOGETHER, lining up vinyl corners, and pin. Place interior pieces RIGHT SIDES TOGETHER and pin.

With exterior pieces on the left and interior pieces on the right, zipper teeth should point toward the right, with zipper tape on the left.

This is how it should look: exterior pieces pinned on the left and interior lining pieces pinned on the right.

Begin stitching all three sides of exterior pieces together using 3/8" seam allowance. Sew as close to zipper teeth as possible without sewing into them.


Finish stitching bag
Stitch interior lining pieces together, using 1/2" seam allowance. Leave 2-3 inches open at the bottom.
You'll use this opening to turn the bag.
Tip. Creating a larger seam allowance for lining allows the lining to fit into the bag without rippling.
Trim vinyl corners of exterior pieces to 1/8", just near the corners. Be sure not to cut into your stitch line.

Trim interior lining pieces to 1/8" all the way around, leaving the opening untrimmed.

Push your entire bag through the opening.

Finishing your bag
Open your zipper all the way and reach inside the bag to push out the end of the zipper, making a sharp corner. Also push the vinyl corners out.
Pin hole in lining closed.


Using 1/8" seam allowance, stitch lining closed.
Tip. For an even more seamless finish, handstitch the opening closed using a slipstitch.


Folding and pressing
Push your lining into your bag.

Press with a hot iron, being careful to avoid ironing the vinyl corners.

Measure 3" down from zipper and fold top of bag down.

Press fold down with hot iron.

Create zipper pull
Thread one end of vinyl strip into your zipper pull.

Place one edge on top and loop around the back, as shown.

Then pull piece up and over and through the loop you've created to form a knot. Tighten your knot by pulling gently on both ends. Trim ends at a diagonal.

CONGRATULATIONS!
You've created a beautiful clutch!

Instruction Summary Sheet
1. After cutting all pattern pieces, apply medium weight interfacing to exterior pieces, fold one long edge 1/4", and press fold with hot iron. Place lining onto flannel, fold one long edge down 1/4", and press.
2. Attach vinyl pieces onto bottom corners of exterior pieces by topstitching into place using 1/8" seam allowance. Do not pin before sewing.
3. Create interior pocket. Place pocket pieces right sides together, pin, and stitch using 3/8" seam allowance, leaving 2-3 inches on one long edge not sewn. Clip corners, turn pocket, and press. Topstitch top edge of pocket. Center pocket on one interior lining piece, 1.5" from the bottom. Stitch bottom and two sides to finish pocket. (Optional) Topstitch fabric label above pocket near top edge of lining.
4. Attach lining pieces to underside of zipper, sewing top folded edge close to the metal teeth onto the zipper tape with 1/8" seam allowance. Lining piece with pocket should be sewn with zipper closed and zipper pull on the left. Repeat for other lining piece.
5. Attach exterior pieces to zipper, sewing each folded edge to the right side of the zipper.
6. Pin right sides of exterior pieces together, lining up vinyl corners (but not pinning through them). Pin right sides of lining pieces together.
7. Stitch all the way around exterior pieces using 3/8" seam allowance. Stitch around the lining pieces using 1/2" seam allowance, leaving 2-3 inches open to turn bag.
8. Push bag through opening in lining, then open zipper all the way and push out vinyl corners and zipper edges. Stitch hole in lining closed with 1/8" seam allowance.
9. Push lining into bag and zip. Press well, avoiding vinyl corners. Fold bag 3 inches from top and press.
10. Create zipper pull. Enjoy your new bag!


0 comment:
Post a Comment