
Liberty & Linen Napkin with Reverse Applique & Bias Binding Tutorial. Mix in some bias binding, a spot of reverse applique and a few hand stitches & you’ve got yourself some personalised cloth napkins…
Make a set for the whole family – it could be a fun project for everyone to pick their favourite fabric for their initial.
To make a pair of napkins you will need:
4 (2 for the fronts & 2 for the backs) squares of linen cut to required finished size (mine are approx 15″ but you could make any size you fancy).
Liberty scraps
Double fold bias binding (enough to go around both napkins, I used approx 3yds)
Small piece (scrap) of lightweight iron on interfacing
Thread (floss or cotton perle) for hand stitches (optional)
Scrap of paper (to draw your initial on) & marker pen
Water soluble or fading fabric pen (or a regular pencil should do the trick too)
Pointy little scissors (like embroidery scissors)
Small round object like a mug or a side plate
Tailors chalk
Lots of pins!
How to:
Draw your initial on the scrap of paper with the maker pen. Draw it any size you fancy. I drew mine so they would sort of fit into a 4″square. If you don’t feel confident to draw your initial you could pick a font you like in Word and print it out at your preferred size. Keep in mind you will be sewing around this & cutting it out so you might like to keep to a simple font rather than one that’s too fancy & fiddly.
Flip your scrap of paper over and draw over the line that should be showing through from the other side. Your initial will now be in reverse. Some letters might not need this, like O, A, I, T etc depending on how you have drawn it or the font used.
Place your scrap of lightweight interfacing with glue side down over your initial & using a water soluble pen or a pencil trace your backward initial onto the interfacing.

Roughly cut around the interfacing letter and place the glue side onto the wrong side of your Liberty scrap.

Following manufacturer’s instructions, iron the interfacing in place & trim to size. It’s a bit light in the image below but the outline of my initial is clear enough to sew around.

Take the front square of your napkin & on the wrong side place the Liberty scrap (with your initial ironed on) with the right side of the fabric facing down.

Play around with the position until you are happy and then pin in place. I positioned mine to the left bottom corner so when it’s all finished & the right way around it will be on the right bottom corner.

Using the applique foot on your machine (or free motion if you prefer), shorten your stitch a bit then slowly & carefully sew around your initial using the line you drew on the interfacing as a guide. Back stitch at start & finish. I sewed just outside the line so my initial didn’t appear too narrow once it was all cut out.

Because I am using linen & it is very fray-y (which I love but I don’t want these napkins falling apart after a couple of washes) I sewed a second line just outside the first.

Carefully trim around your initial.

Flip your linen square over to the right side & you will see the stitch outline of your initial. Sort of pinch & hold onto the interfacing at the back while sort of pinching & holding onto the linen inside the stitched initial to separate the 2 layers as you very carefully use some little pointy scissors to make a snip through the linen only. I aim for the middle for the first cut and then you are away – sorry about the super blurry photo – pinching, holding & carefully snipping is not conducive to photo taking it appears! lol!

Once You have made the first cut it all becomes easier but you still need to be careful not to cut through the back layer of Liberty. Cut around the inside of your initial leaving approx 1/4″ or thereabouts of linen inside the stitch line.

ta da! one reverse applique initial :)

If you like you can pop a hoop on & add a few hand stitches at this point.

Lay out your back piece of linen right side down,place your front piece of linen (with your reverse applique initial on) directly on top with right side up.
Take a small round object (I used a side plate) to use as a template to mark the rounded corners. Place it on the corners and when you are happy with the position of the roundness, trace around with your tailors chalk.

Cut off the corners (both layers)

Now we’re ready to attach the bias binding! If you’ve never used bias binding before the joy of it is that it happily bends around corners crease free.
Open out your double fold bias and make sure the beginning of your bias is cut at a 45 degree angle (mine was, thanks Jo x). Pin it on all the way around through both layers of linen, don’t trim it to size just yet.

When you have pinned all the way around, Lay your tail end over the start and mark a 1/4″overlap following the 45 degree angle at the start of your bias.

Cut along the line you marked and pin together the two ends.

Remove a few pins either side of the join so you can sew it easily and sew together the join with a 1/4″seam.

Press your seam open and pin it back in place.

Sew right around your bias trim following the first crease mark.

Take it slowly around the corners so you don’t get any tucks in the bias. Back stitch at start & finish.

Your napkin should now look a bit like this.

Next we’re going to fold the bias over to the back of the napkin.
Open out the bias (it’s probably tried to fold itself back along it’s nice neat creases). With the edge of the napkin away from you, fold your bias along the crease nearest to you.
Then fold it up along the stitch line (not the next crease).

Flip your napkin over and fold the bias down over the edge of the napkin towards the back and pin in place.
The edge of the folded bias on the back will cover the stitch line you made sewing the binding on a moment ago.
Point your pin heads towards the outside so you can easily remove them as you sew the binding in place in the next step.

Flip your napkin back over to the front and sew just inside the bias seam (approx 1/8″), this will catch the bias at the back & sew it in position.
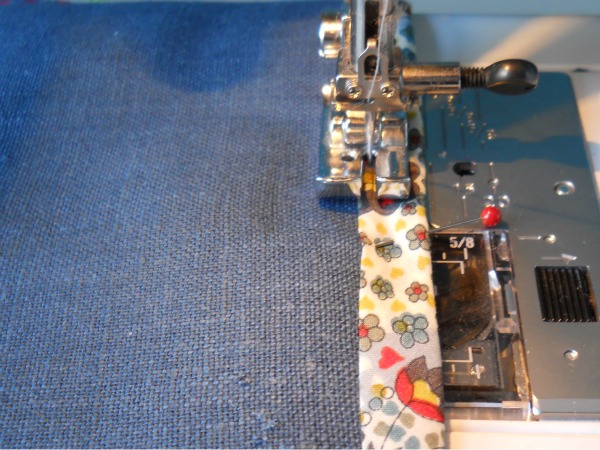
voila, nice & neat bias binding!

Your napkin is complete…


0 comment:
Post a Comment