
Often the size of the lady bag is missing. And we complement it with packages, where we put everything that I did not fit in a female bag (no matter how much it was). I propose to sew a simple bag that will replace our countless packages to us.
For sewing, we will need:
- the main tissue with a width of 150 cm - 45 cm;
- lining tissue with a width of 150 cm - 45 cm;
- fabric for finishing with a width of 110 cm - 20 cm;
- colored patchworks for appliqué;
- zipper for a bag of 40 cm long;
- auxiliary materials: polyester batting, adhesive paper for applications, gossamer, woven interfacing;
- threads.
The sizes of the bag are visible from the pattern: the bag width is 30cm, the height is 36 cm, the width of the bottom is 9 cm. Roundings with a radius of 6 cm.

I suggest decorating the front panel of the bag with a fabric applique. Choose a drawing for the application.

I marked the colors of the parts in the diagram. We translate the drawing into tracing paper.

We cut out our details — we get templates for the application.

Don't forget to sign the colors.
We take the paper for the application, put the templates of the same color on the paper (the glue layer from the bottom) and outline them.

On a piece of fabric of the desired color, we glue the paper for the application with the transferred patterns of templates with an iron — we put the paper with the adhesive side up, put a flap of fabric on top, hold the iron for 10 seconds.

Thus, we transfer all the application templates to colored patches and cut out the details.

We take the front fabric for the bag. Plotting the middle. And with the help of the drawing on the tracing paper, we place the central parts in the middle of the fabric

(first remove the paper, put the adhesive side down). We glue it with an iron

We sew the details with an application seam or a zigzag.

Thus, gradually, first we glue, and then we sew all the details of the application.


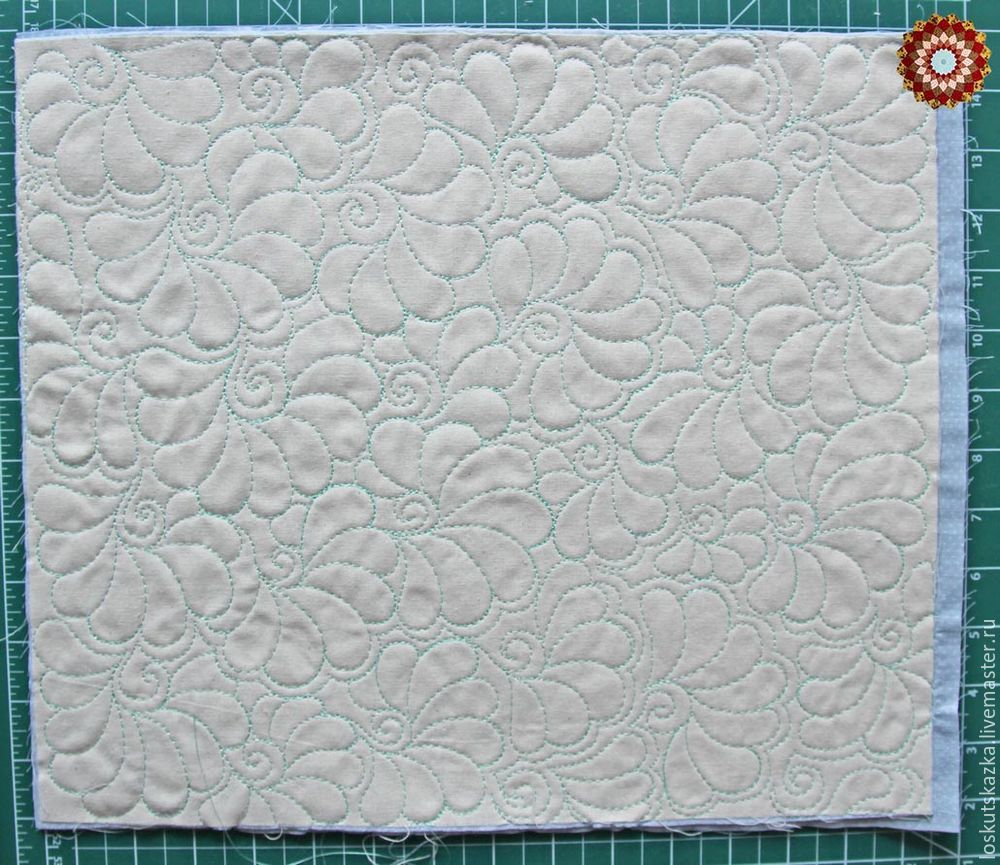
We assemble a patchwork sandwich: we glue a 1.5 mm polyester batting to the front fabric (iron with steam, temperature cotton, press movements hold for 10 seconds), we glue the lining to the polyester batting on the back side with the help of a gossamer.

We make two pieces for the front and back of the bag. The workpieces are quilted with a free-running machine stitch.

We make the same blank for the bottom of the bag

Width 10 cm, length at least 100 cm.
We will make a bag with a zipper, so for the slats we cut out four rectangles with a length of 33 cm, a width of 5 cm.

To strengthen the slats from the woven interfacing 155 we cut out rectangles of 31x3 cm and glue them on the slats

Allowances for short edges are bent by 1 cm.
We open the zipper, on one side of the zipper, close to the beginning, we pin the planks from the top and bottom and sew them.


We bend the slats on the front side and sew them.

In the finished form, the slat will be 7 cm.
The long end of the zipper is cut off, the open edge is processed by turning. To do this, we cut out two rectangles from the finishing fabric 3x5 cm. We step back from the cut of the zipper by 1 cm and pin our rectangles.


We sew on three sides.

We turn it out and sew up the open cut.


We prepare the handles. From the finishing fabric, we cut out 2 rectangles with a length of 50 cm and a width of 8 cm. As well as a pad made of 48x3 cm adhesive polyester batting. For additional strength, the fabric can be reinforced with an adhesive interlining. We glue the polyester batting to the middle of the fabric.

We pin and bend the allowances by 1 cm.

We sew the handles — several parallel lines.

Inside the bag, we will make a small hanging pocket.
For it, we cut out a rectangle of 22x59 cm. We fold it in half and glue it together with a gossamer (for density).

The lower edge is treated with a strip of fabric and we bend it up to 12 cm.

The sides of the pocket are also processed with strips of fabric.

It turned out a nice tight pocket.
At the front and back of the bag, we round the lower corners. I took the dessert plate. The radius must be at least 5 cm.

We measure the three sides of the bag panel, so we determine the length of the part of the bottom of the bag. The part is cut to the desired length and the short sides are treated with strips of fabric.

On the front and back panels, we sew the handles, retreating from the center by 8 cm in both directions.

On the back panel, we sew a pocket with a technical seam.

Between the panels of the bag we sew a strap with a zipper.

And these edges are treated with strips of fabric.


Pin the back panel and the bottom of the bag with pins

and we lay the seam at a distance of 3-4 mm from the edge. Then we chip the front panel with the bottom part and also lay the seam.

We cut out a TRANSVERSE strip and process the side seams of the bag with this strip


The transverse strip stretches a little, this is enough to process such a side seam.
We fill the bag with a terry towel and iron it with steam, leave it to dry.
The bag turned out to be comfortable, functional and the applique made of fabric decorated it very much.


0 comment:
Post a Comment