
Metal frame purses or clutches are the perfect project for the beginning sewist. In this tutorial you will learn about constructing the basic shape of a bag or clutch, creating boxed corners, and securing fabric to a metal frame. Let’s get started!

About the fabric
You can use any woven fabric for these clutches. I prefer to make mine with a strong linen or linen/cotton blend on the outside, and a cotton for the lining. This gives the purse some body and strength. If you decide to use a quilting cotton on the outside, I suggest using canvas for the lining, or something similarly strong.

How to create your own pattern from any frame
Here is a picture of what your pattern will look like when we’re done, if you use one of these frames:

Keep in mind, if you use a different frame, the top half of your pattern will be shaped differently.
STEP ONE
Place your hardware on the paper and mark the spots I specify in the picture below. FYI, the height of my clutch in the pattern is 4 1/4″ from frame to bottom edge. I did not include a boxed bottom on this clutch. If you want to add a boxed (flat) bottom, add at least 3/4″ to the bottom of your pattern.

STEP TWO:
At this point, you need to do a couple of things:
Add 1/2″ to the top of your height line for the seam allowance. OH LOOK, I misspelled “height” in the photo. I swer i went to colege.
Add 1/2″ to the bottom of your height line for seam allowance. The depth of your clutch will depend on the frame you’ve chosen, but don’t worry, you don’t need to draw any more lines for that. I just wanted to point out that your pattern may be deeper than mine, or the other way around, depending on your hardware. If you have a wider frame, your clutch needs to be deeper than mine to compensate, so make that line longer.

STEP 3
We are only going to draft the RIGHT SIDE of a pattern from here on out.
Trace the curved line of your metal frame, and let it extend 1/4″ to 1/2″ down from where the frame ends. Here, draw a line that extends 1″ out from the edge of the frame. I call this the corner line. See the picture below for reference. The corner line I’m talking about has 1″ written below it.
At the very bottom, draw a line from your center point that stops short of the corner line by 3/4″ or 1″. Again, see the picture for reference.
I hope this is making sense.

STEP FOUR
Connect the lines so they look like this:

STEP FIVE
Now, trace a copy of your pattern on a clean sheet of paper.

Fold the paper in half along the center line and cut out your pattern.

LOOK AT THAT, you’re very own clutch pattern. Hooray!

Here’s a refresher of my dimensions, just in case. Remember, yours may be different if using a different frame.

INSTRUCTIONS
1. First, print your pattern piece and cut it out. Now cut 2 from your main fabric and two from your lining.

2. Make sure you transfer the markings from the pattern (dots) to your fabric pieces.

3. Put your lining and main fabric pieces together, with their right sides facing. This means that the front sides of the fabric are facing each other, and the back sides of the fabric are facing out). Pin these together if you wish.
Using a 3/8″ seam allowance, sew along the curved edge from marking to marking on both sets. Now you will have a back piece and a front piece (they should look the same).

4. Open your front and back pieces up and put them together, with right sides facing each other. You should see the back sides of the fabric facing out, as in the picture below. Sew them together with a 3/8″ seam allowance, using the markings you transferred as beginning and ending points. Make sure you secure the stitches at the beginning and end by backstitching. (See the black line below for reference).

5. Now repeat this process on the lining fabric. HOWEVER, this time you need to leave a 3″ space so you can turn your pieces right side out. Use the back lines int he picture below as a reference. Be sure to use a 3/8″ seam allowance and backstitch at the beginning and end of each line of stitching.

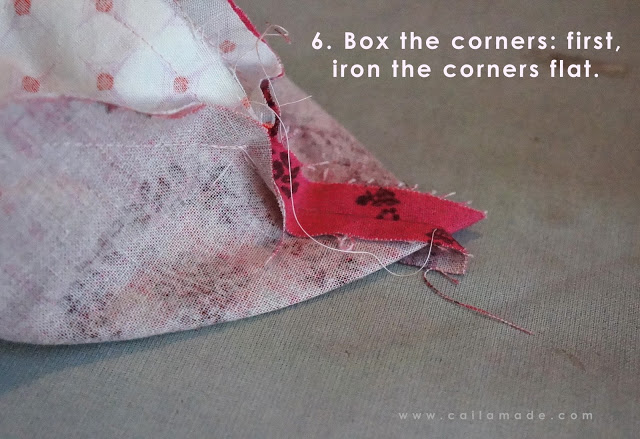
6. Now you will begin boxing the corners. Repeat this step for all four corners–2 corners on the main fabric, and two corners on the lining.
First, pinch the corner together so that it looks like the picture below. To make sure your corner isn’t wonky, do your best to pinch it with an equal amount of fabric on each side. Press the corner so it’s nice and flat.
7. Using a ruler, mark a line 3/4″ from the corner point. Sew along this line, making sure to backstitch at the beginning and end.

8. Trim the corner off. Repeat this for all four corners of your clutch.

9. Trim the seam allowance to 1/4″ on your curved seams only, and then clip the seam like in the picture below. This ensures that your seam will lay flat when turned right side out.

10. Turn your clutch right side out through the opening in the lining.

11. Take it over to your ironing board and press it well.

At this point, you should stitch the lining closed. You can do this either by hand, or at your machine. To close the opening on your machine, pin the opening closed and sew as close to the edge as possible.
12. This is how your clutch should look at this point. Yay! As an optional step, you can go around the opening with an edge stitch. Edge-stitching simply means that you sew as close to the edge as possible. As you can tell, I didn’t edge stitch mine because it’s not necessary, only cosmetic. Once the hardware is on your clutch, only the edge-stitching on the very corners will be visible.

Now it’s time to add the hardware to your clutch! This part is easy-peasy and only takes a few minutes. Letting the glue dry is the longest (and hardest!) part.
1. Make sure you have all the supplies: clutch, metal frame, and glue.

2. Fold down the side you are not gluing so it doesn’t get in the way.

3. Squeeze the tube until some glue starts coming out. Apply a liberal amount of glue to the inside of the frame. Look carefully to make sure there is plenty of glue the full length of the frame. Wait about 30 seconds for the glue to become tacky.

4. Sip your fabric edge into the frame, making sure that the center of your clutch is lined up with the center of the frame. You can pull the fabric from side to side to make sure it’s centered properly. Make sure the fabric is pushed all the way in along the full length of the frame.
If necessary, you can use a small pointed object, like a pair of craft scissors or a dull pencil to push your fabric in. Honestly, this pattern fit so well for me that I just slipped it in with my fingers and, presto!
Leave it to dry for 10-15 minutes. Resist the urge to pick it up before it’s fully dry! If some of the glue oozes out onto the frame, you can pick it off with your fingers. It should come off easily. If glue gets on the fabric, I’ve heard you can use fingernail polish to gently remove it. I would test the polish remover on a spare scrap of fabric first, just to be safe.

Once the first side is dry, repeat the steps to glue your remaining side to the frame. Allow this side to dry 10-15 minutes and YOU’RE DONE!
Now, go fill your clutch with all kinds of good things: business cards, change, iphones, or makeup!


0 comment:
Post a Comment