spool-along block 9
Block size 4-1/2″ x 12-1/2″(4″ x 12″ finished)
Cut the following:
background fabric
(2) 1-3/4″ x 7-1/2″ rectangles
(1) 4-1/2″ x 4″ rectangle
spool fabric
(1) 2″ x 7-1/2″ rectangle
(2) 4-1/2″ x 1-1/4″ rectangles
thread fabric
(0) None. We’re outta thread in this block!*
*If you can’t bear to sew an empty spool block, replace the center 2-1/2″ x 7-1/2″ spool rectangle with a striped thread fabric like in the block above left, or scroll down for the foundation paper-pieced “almost out” block. Or why not make all 3 variations!

Instructions:
(all seams are 1/4″, sew right sides together)
1). Sew a 1-3/4″ x 7-1/2″ background fabric rectangle to each side of the 2″ x 7-1/2″ spool fabric rectangle to make a unit 4-1/2″ x 7-1/2″ as shown. Press seam allowances toward the spool fabric.
2). Sew a 4-1/2″ x 1-1/4″ spool fabric rectangle to the bottom of the Step 1 unit and the remaining 4-1/2″ x 1-1/4″ spool fabric rectangle to the bottom of the 4-1/2″ x 4″ rectangle as shown. Press seam allowances toward the spool fabric.
3). Sew the two Step 2 units together as shown in the completed block. Press seam allowances toward the spool fabric.


foundation paper-pieced variation: almost out
To make the center 2″ x 7-1/2″ spool-with-a-little-thread unit you’ll need:
spool fabric
(1) 2-1/2″ x 9″ rectangle
thread fabric
(1) 2-1/2″ x 5-1/2″ rectangle striped fabric with the stripes going across the short side from left to right
paper-foundation pattern (PDF, click here to download)
Note: The PDF includes the original and a reversed pattern. The original is shown in the tutorial photos.1). Place the 2-1/2″ x 9″ spool fabric rectangle right side down and place the paper-pieced pattern on top with the 1/4″ dashed line aligned as shown in picture 1.
2). Fold the paper pattern on the dashed line between 1 and 2 and line up a ruler 1/4″ beyond the folded line and trim as shown in picture 2.

3). Repeat Step 2 on the other 2-1/2″ end of the spool fabric, right side down. You will end up with a piece like the one shown in picture 3.
4). Place the 2-1/2″ x 5-1/2″ thread fabric piece right side up underneath the spool fabric, lining up one of its 2-1/2″ ends with one of the trimmed diagonal ends of the spool fabric as shown in picture 4.

5). Place the folded paper pattern on top of the fabric stack as shown in picture 5, with Section 1 on the fabric, 1/4″ extending beyond the folded paper line. Section 1 should be centered between the edges of the fabric.
6). Carefully open up the paper pattern without shifting the fabric and pin Section 1 through both layers as shown in picture 6. The fabric should be right sides together, thread fabric on bottom. The short edges aligned 1/4″ beyond the line between Section 1 and 2, and Section 1 should be centered from side to side on the spool fabric. The thread fabric should be angled out from the pattern and spool fabric as shown.
Using a short stitch length to perforate the paper, sew on the line between Section 1 and 2.

7). When you unfold the fabric after sewing, the spool fabric will be covering Section 1 and the thread fabric will be covering section 2 as shown in picture 7.
Turn the piece over so the paper is on bottom and the fabric is on top. Place a piece of scrap fabric underneath (Toner-based printing will transfer with heat, so you will want to protect your ironing surface if you printed the pattern with toner). With a dry iron, gently press the fabric open.
8). Trim the excess spool fabric even with the paper pattern as shown in picture 8. There will be 1/4″ or so of fabric on both long sides of the pattern. Leave that to be trimmed at the end.
9). Fold the pattern back over on the dashed line between Section 1 and 2. Trim off the excess thread fabric as shown in picture 9, leaving a 1/4″ seam allowance over the folded line.

Picture 10 and picture 11 show what the front and the back of the unit looks like so far. Notice the direction of the prints: the spool fabric grain aligns with the pattern rectangle and the thread fabric is on a diagonal. As you continue to sew more fabric to the pattern, the spool fabric will be in the odd-numbered sections and its grain should continue to be aligned straight up and down. The thread fabric in the even-numbered sections will follow the diagonal lines marked on the pattern.

10). Place the paper pattern printed side down/fabric side up. Align the second angled edge of the spool fabric that you cut in Steps 2-3 right side down, along the trimmed edge of the thread fabric on the pattern as shown in picture 12. Picture 13 shows the view with the paper side up. There will be 1/4″ of fabric over the dashed line between Section 2 and 3 on the Section 3 side.
Notice the intersection that the yellow arrow is pointing at. The corner of the spool fabric should be extending about 1/8″ (or less) past the paper pattern. Do not center the spool fabric over the paper pattern. If you look at the paper side in picture 13, the edge of the spool fabric is extending 1/8″ from the shortest side of of Section 3 and there is more fabric extending past the opposite side of Section 3.
11). Pin the fabric to the paper pattern as shown in picture 13 and sew on the dashed line between Sections 2 and 3 with a short stitch length.

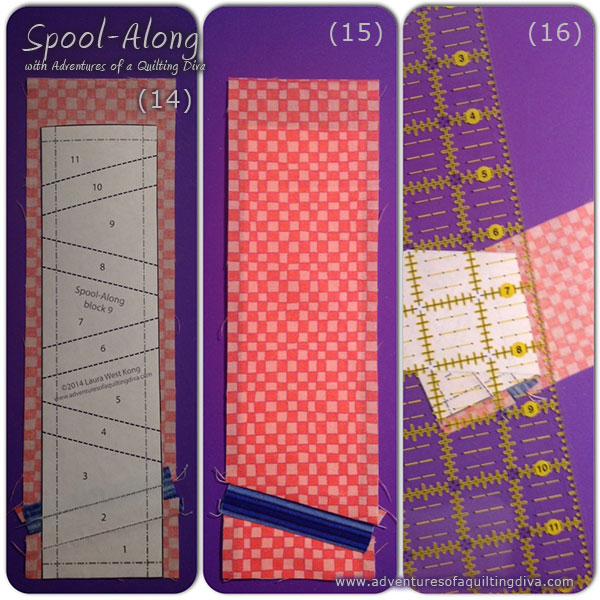
12). Open up the fabric and press with a dry iron. The back and front of the unit at this point is shown in picture 14 and picture 15. Fold back the paper pattern on the line between Section 2 and 3. Then trim the excess spool fabric 1/4″ away from the folded pattern as shown in picture 16.

13). Line up the thread fabric right side down along the cut edge of the spool fabric on the paper pattern as shown in picture 17. Center the thread fabric with about equal excess fabric on either side of the paper pattern as shown in picture 17.
Pin the fabric to the paper pattern as shown in picture 18 and sew on the line between Sections 3 and 4 with a short stitch length.

14). Open the fabric up and press with a dry iron as shown in picture 19. The reverse side is shown in picture 20.

15). Fold the paper pattern on the line between Section 4 and 5, then trim the excess thread fabric, leaving a 1/4″ seam allowance as in Step 9.
Picture 21 shows the progress so far. Notice the spool fabric straight grain is still aligned with the pattern rectangle and the thread fabric grain is following the diagonal of the pattern lines.

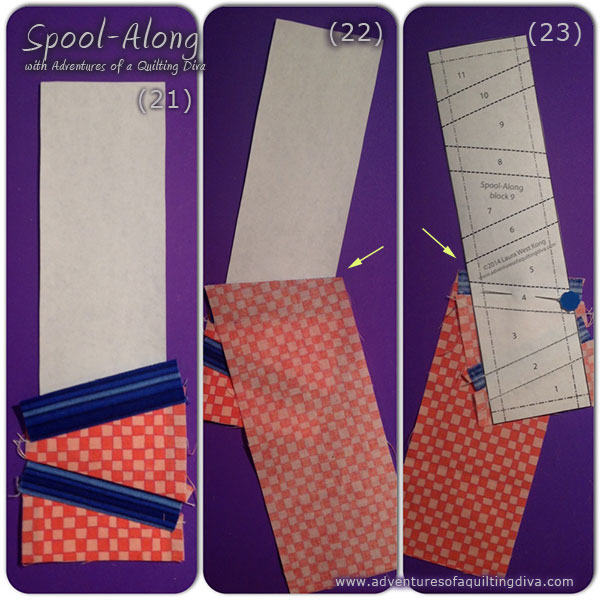
16). Place the cut diagonal edge of the spool fabric face down along the cut edge of the thread fabric as shown in picture 22 and picture 23. The fabric will be 1/4″ over the dashed line between Sections 4 and 5. Align the fabric’s corner 1/8″ away from the shortest side of Section 5 like you did with the spool fabric in Steps 10-11.
Sew on the dashed line between Sections 4 and 5 with a short stitch length. Press and trim excess fabric with a 1/4″ seam allowance as before.

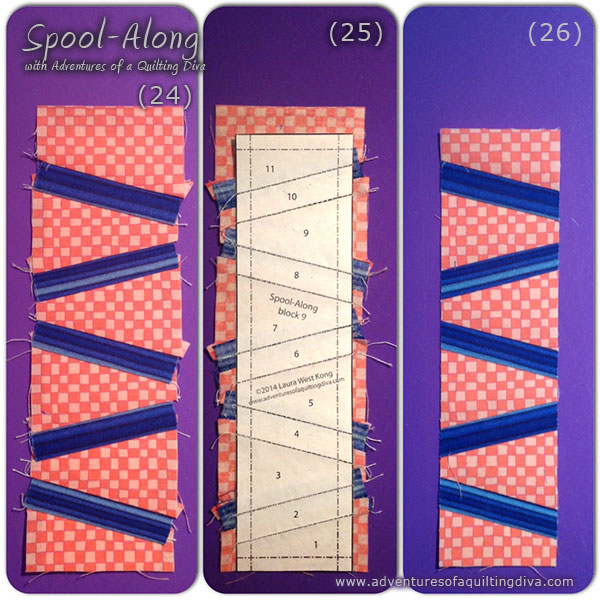
17). Continue sewing fabric to the paper pattern until all eleven pieces are filled, picture 24 and picture 25. Alternate thread fabric in the even sections and spool fabric in the odd sections. Center the thread fabric and align the spool fabric 1/8″ away from the short side of the sections.
18). Trim the excess fabric along the remaining 3 outer edges of the paper pattern, picture 26. Carefully tear off the paper pattern from the back of the unit. Follow Block 9′s Steps 1-3 to assemble the block, using this foundation paper-pieced unit in place of the 2″ x 7-1/2″ spool fabric rectangle.
Happy sewing!
Next Tutorials:
Spool Quilt Block Tutorial. Block 1Spool Quilt Block Tutorial. Block 2
Spool Quilt Block Tutorial. Block 3
Spool Quilt Block Tutorial. Block 4
Spool Quilt Block Tutorial. Block 5
Spool Quilt Block Tutorial. Block 6
Spool Quilt Block Tutorial. Block 7
Spool Quilt Block Tutorial. Block 8
Spool Quilt Block Tutorial. Block 9 (this page)
Spool Quilt Block Tutorial. Block 10
Spool Quilt Block Tutorial. Block 11
Spool Quilt Block Tutorial. Block 12


Да, я тоже мечтаю это попробовать! Но боюсь начать...
ReplyDelete