
This basket was made with blue edging on the top of the pockets, using my Fabric Basket Tutorial. It is written for absolute beginners, if you can sew a line (preferably straight) you can do it!
These are the perfect size to fit our fat quarters (the way we fold them!) most of our sewing patterns (they are the perfect width for Sewaholic, Colette, etc) and look just lovely stuffed full of pretty skeins of yarn. I bet you can’t wait to make your own.

Makes a finished basket measuring 9.5” Long, 6” deep and 6” high.
You will need:
Fabrics (We used Gleeful by Sew Caroline, Art Gallery fabrics)
• 2 Pieces 17”x 10” for the main basket body
• 2 Pieces 17”x 10” for the interior lining
• 2 Pieces 17”x 5” for the exterior pockets
• 2 Pieces 17”x 5” for the pockets lining
• 2 Pieces 10”x 5” for the handles

Fusible Fleece (We used HeatnBond Fusible Fleece Iron on High Loft, Non Woven)
• 2 Pieces 16”x 9” for the main basket body
• 2 Pieces 16”x 9” for the interior lining
• 2 Piecies 10”x 1 1/4” for the handles
Tools
• Sewing Machine, Scissors, Pins, Ruler, Pencil, Selection of Matching Threads, Iron
Instructions
****All seam allowances are ½ inch*****
1) Iron all your fabics and cut them to size. We are using Charms Abloom (pink) for the main body, Springs Breeze (white) for the lining, Preppy Fleurs (blue) for the pockets, Springs Sun (yellow) for the pocket lining and Charms Abloom (pink) for the handles.
2) Cut the fleece to size

3) Place the fleece on the wrong side of the fabic leaving an even border all round. Flip the fabric and fleece over and using the iron fuse the fleece to the fabric following the manufacturer’s recommendation.


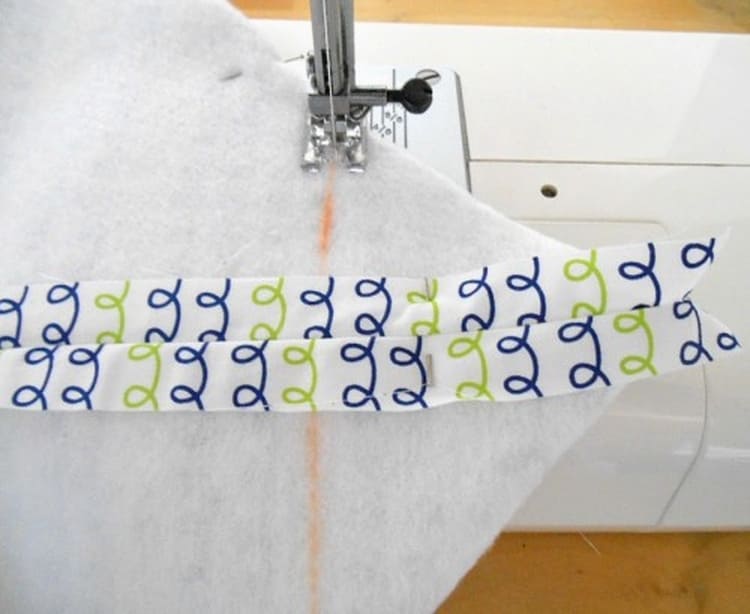
4) To make the handles, fold the handles fabric in half wrong sides together and press a crease with the iron

5) Get the strip of fusible fleece and place it along the crease


6) Fold down the fabric around the fleece and press. Fold the other side and press.


7) Fold again to form a strip and press well. Choose a matching thread to sew around the handles.


8) Trim the handles to be exactly the same length.

9) Mark a line ½ from the edge on each handle. This will be your mark for the final assembly. Put to one side.

10) Take a pocket outer fabric and a pocket lining fabric. Place them right sides together and pin both long sides.


11) Sew along both long sides, locking your seam at the start and finish. Make sure you leave the short sides unstitched. Repeat for the second pocket and lining.


TIP: To ensure accuracy, stitch only one long side of the second pocket. Then place over the first pocket and mark the stitch line for the other side. This will ensure your pocket pieces are absolutely identical in height and give nice matching seams to the finished project.
12) Iron the pieces from the wrong side well.

13) Roll the tube you have made, pressing the seam open with your hand. Iron the open seam down.

14) Turn the tube right side out and press those seams open again


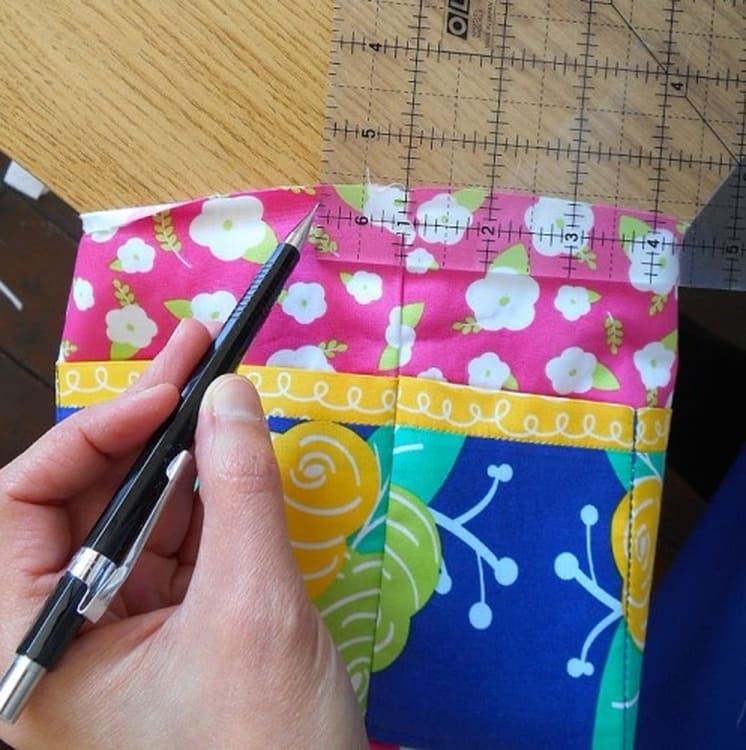
15) Get your ruler and your pencil and mark ½ inch above the seam line. This will create the top edging of the pocket.

16) Carefully roll the fabric back and press a crease on the pencil drawn line. Take your time and move the iron slowly. This is what it will look like from both sides.


17) Repeat the process with the other pocket and you will have two nicely pressed pieces.


18) At the sewing machine you will stitch in the ditch between the yellow and blue fabric to stabilise the pocket. Use your ditch foot and a suitable colour thread. If you don’t have this foot, just stitch slowly. I used a yellow thread as I did not want it showing at the back.


19) Place the pocket on your main outer fabric. Make sure you have the edging on the top. Measure 3” ½” from the bottom of the main fabric- this will be where you place the bottom of the pocket. Pin in place.

20) Now you may wish to divide the pocket into compartments. I marked 3” ½” from the left and the right edge, to coincide with the corner of the basket, once it is formed.


21) To mark a centre line, fold the fabric over to find the middle point and press with your finger to form a crease. Using that as a guide mark a line down the centre of the pocket.


22) Choose a suitable thread for the pocket and begin sewing the long bottom side of the pocket. Make sure you do NOT sew the top with the edging. Lock your stitch at both ends.


23) Now sew the vertical lines to divide the pockets. I like to use triple stitch, backstitching a few times at both ends.


24) Use a zig zag stitch at the end of each pocket, to stop any fraying and ensure a neat finish. Repeat for the other main fabric and pocket. Once you finish sewing press well with the iron.


25) Place the main outer pieces right sides together, with the open part of the pocket to the top. Take care to match the top edging and pin the left, bottom and right side.


26) Sew these three sides- do NOT sew the top.

27) Mark a 3” by 3” square from the sewing line (or 3” ½” from the fabric edge) at both bottom corners. Flip over and do the same on the other side.

28) Stand your project up and push the corner down to form a triangle. Press the seams open with your finger.


29) Looking inside the basket, match the two lines. Walk your fingers slowly on the outside of the basket, matching the lines as you go. Pin in place.


30) You should now have the line you drew before as your guide to sew over.


31) Stitch on the line, locking your stitch. You may want to use triple stitch or go over a couple of times.

32) Trim the excess leaving a ½” seam allowance.

33) Repeat for the other side and your project will look like this. Turn it right side out.


34) To attach the handles lay the basket flat and mark 1” either side of the centre seam.

35) Position the handle using the ½” mark you made earlier as a guide.

36) Pin in place and repeat for the other end of the handle. Do the same for the other side of the basket.

37) Secure the handles to the body using a zig zag stitch. This will ensure they stay in place for the final assembly.


38) To make the lining, get your two lining fabrics.

39) Place right sides together. Pin left, bottom and right sides.


40) Stitch leaving the top side open.

41) Mark just as you did for the outer main part.


42) Stitch along the line to box the corners and trim the excess.


43) You should now have the lining and the basket ready to iron.

44) Iron the seams of the lining flat. It helps if you hook it at the end of the ironing board.
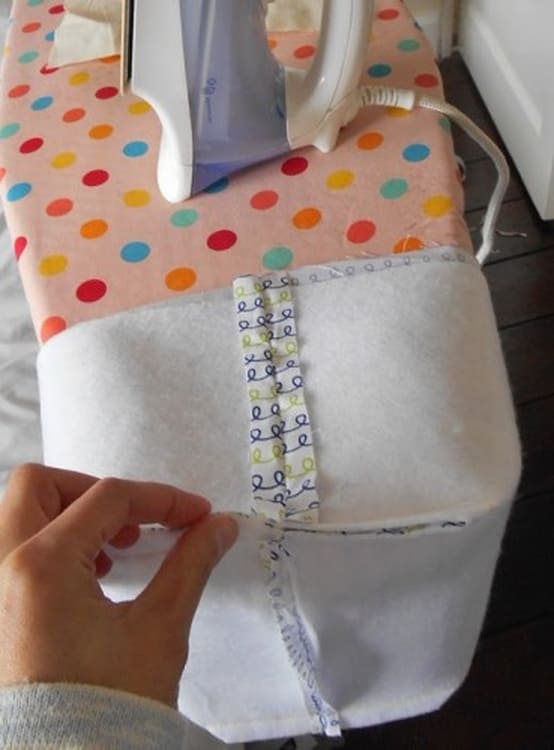

Use a pressing cloth to protect your iron from the fusible fleece.

45) Following the fleece edge and fabric pattern as a guide, turn a ½ edge and press. Continue working all around. Turn an edge for the outer basket too. Use the ruler as a guide if necessary.


This is what both should look like now.
46) Place the lining in the basket. Do not worry if it looks a mess, it will look nice soon!


47) Line up the seams and start pinning. Use lots of pins

48) Sew all round locking the stitch. You may want to increase your stitch length and width now to allow for the bulk of all the layers. I stitched a second line just under the first one, for decoration.

And you are done!


0 comment:
Post a Comment