
Valentine's Day is such a fun holiday. I love hearts, candy, and the colors pink and red...and I especially love having a reason to give sweet little treats and gifts to family and friends.
I was recently inspired to make these heart bags and after a couple of prototypes and a few tweaks, I'm really excited about how simple this project actually is.
These pouches have a fun little heart-shaped peek-a-boo window that gives a glimpse of the treats inside. They are quick to make and are perfect for Valentine's Day, Weddings, Birthdays, or anytime you need a little gift for a friend.
You could also make a couple for yourself! They're great for storing jewelry or little trinkets and you'll always be able to see what's inside the bag.
Here's how you can make your own Peek-A-Boo Heart Pouch...

Supplies
Exterior bag fabric - 7" x 16" rectangle
Interior/accent fabric - 7" x 21" rectangle
1 yd. of cord
Clear vinyl - 5" square
Heart template
Disappearing ink fabric marker or pencil
Scissors
Thread
Safety Pin
Sewing machine
Step 1: Iron the short ends of the large rectangle under 1/4". It helps to pin them in place first.

Step 2: Center the smaller rectangle on top of the larger rectangle, right sides together. You should have exactly 2" of the large rectangle sticking out on either side of the short rectangle. Precision is important.

Step 3: Fold your rectangle sandwich in half so that the short ends of both rectangles match up. Lightly press the fold to create a crease at the center of both rectangles.

Step 4: Cut out your heart template if you haven't already done so.

Step 5: Open up the folded rectangles and center the heart template 1 1/4" above the center crease.

Step 6: Use your disappearing ink marker/pencil to trace around the heart.

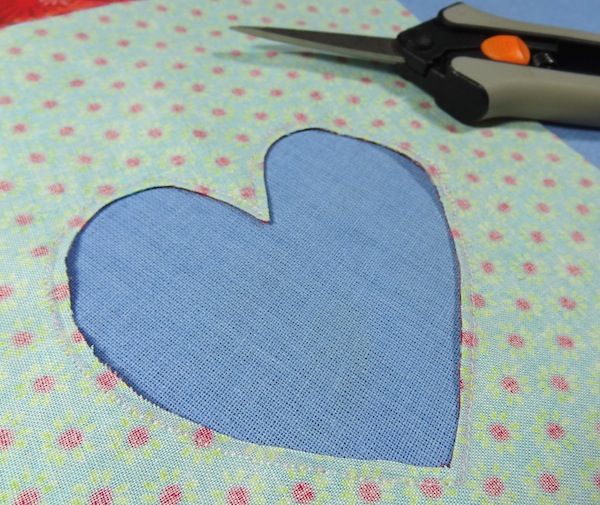
Step 7: Keeping both rectangles together, sew on the line of the heart shape you just drew.

Step 8: Using sharp scissors, carefully cut out the center of the heart shape through both rectangles, 1/8" inside your sewn line. Be very careful not to cut through your stitches.
Step 9: Turn the rectangles right side out, by flipping the exterior fabric rectangle through the center of the heart hole you just cut. You will need to use something with a dull point (ie. pencil) to push the top point of the heart right side out.

Step 10: Press your heart hole so that the seam on the edge of the heart is smooth and flat all the way around.

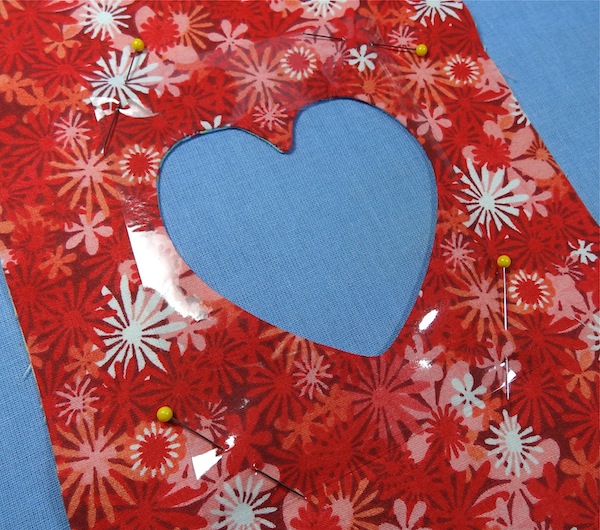
Step 11: Pin your vinyl square on top of the heart hole on the interior fabric side of your rectangles. Be careful to only pin through the four corners of the vinyl square. Do not pin through any of the vinyl in the center of the heart, otherwise there will be pin holes in your finished "window".
Step 12: Flip the heart window over so that the vinyl is on the bottom and carefully sew around the heart window 1/8" from the edge. You may need to adjust your sewing machine tension for this part. I found that I needed to tighten my tension. You can see in the photo for step 13 that my stitches are a bit loose and funky because the tension wasn't quite right on my first attempt.

Step 13: Trim the vinyl 1/8" outside of the stitch line.

Step 14: Fold each of the two fabric rectangles in half, with the right sides of each together. You will be creating a folded rectangle sandwich with the two sides joined by the heart window in the middle. Pin the long edges of each of the folded rectangles together. You are about to create the exterior bag and the interior lining bag.

Step 15: Sew the pinned edges of the folded rectangles together. Remove the pins.


Step 16: Press the side seams open, near the top of both sides of the sewn rectangles. (I had to go back and do this the first time around so the seams don't look pressed in the photo for step 17.)

Step 17: Turn the exterior fabric bag right side out so that the interior lining bag is inside of it.

Your bag should now look like this:

Step 18: Fold the top 2" cuff over and iron the crease so that it is smooth and straight all the way around (Make sure not to iron over the vinyl!).

Step 19: Pin the cuff down, making sure to match up the side seams and stitch it in place around the bottom edge. Be sure to back tack when sewing over each of the side seams to reinforce the stitching in that area.

Step 20: Make a second row of stitching around the cuff, approximately 1/2" to 3/4" above the first. Be sure to back tack when sewing over each of the side seams to reinforce the stitching in that area.

Step 21: Use your seam ripper to open the seam between the two lines of stitching on each side seam of the bag. You only need to remove the stitches from the top layer of the folded cuff fabric.

Step 22: Cut your 1 yd. piece of cording in half and secure a safety pin on the end of one piece. BTW, I found the really neat pink shoelace-like cord pictured below at Hobby Lobby after I had already taken the materials photo for this project. It was too cool to pass up. :)

Step 23: Feed the safety pin through one of the side seam openings you just made and work it all the way around the casing until it comes out through the same hole it went into. Remove the safety pin and secure it by tying the two ends of the cord together in a knot as pictured below. Repeat with the other piece of cord on the other side of the bag.


Step 24: Fill your Peek-A-Boo Heart Pouch with some delicious treats and give it to a friend!


0 comment:
Post a Comment