
Always up for a creative challenge, I decided to use the Talbots bag as inspiration. So this is my version, a similar tote style, with a bit more flair and durability. And, so that you can try your hand at creating your own, here's the longest tutorial I have attempted to date. Fasten your seat belts...
Here's what you'll need:

- An exterior fabric of your choice - I used a medium weight wool suiting (see measurements in step 1).
- Vinyl - I used the highest quality upholstery vinyl available at Joann's, it looks and feels like a lightweight leather (see measurements in step 1). At $35 a yard it's not cheap, but you don't need much for this project. I bought a 10" strip and with a 40% off coupon, it only cost me about $6.
- Lining fabric - (see measurements in step 1).
- Muslin - (see measurements in step 1).
- Peltex 1-side fusible interfacing - (see measurements in step 1).
- 2 cover button kits (1.5")
- Felt to cover the buttons
- Topstiching thread in a coordinating color
- Regular thread in coordinating color(s)
- Hand sewing needle
- Scissors
- Straight pins (not pictured)
- Binder clips (not pictured)
- Rotary cutter, plexi glass ruler, and mat (optional, but it will make the cutting much easier!)
- Sewing machine with walking foot (not pictured)
*Unless otherwise state, a walking foot is recommended for all sewing steps.
*Unless otherwise stated, all seam allowances are one half inch.
Step 1: Cut your fabric pieces in the following dimensions:
Exterior Fabric
Upper Front and Back (2) - 12.5" x 16"
Upper Sides (2) - 6" x 12.5"
Vinyl
Lower Front and Back (2) - 5" x 16"
Lower Sides (2) - 5" x 6"
Bottom (1) - 6" x 16"
Handles (2) - 2" x 24" (you can make them longer if you want)
Lining Fabric
Front and Back (2) - 16" x 15.5"
Sides (2) - 6" x 15.5"
Bottom (1) - 6" x 16"
Pocket (optional) - any size you want
Muslin
Front and Back (2) - 16" x 16.5"
Bottom (1) - 6" x 16"
Peltex
Front and Back (2) - 14.25" x 14.5"
Bottom (1) - 4.5" x 14.5"
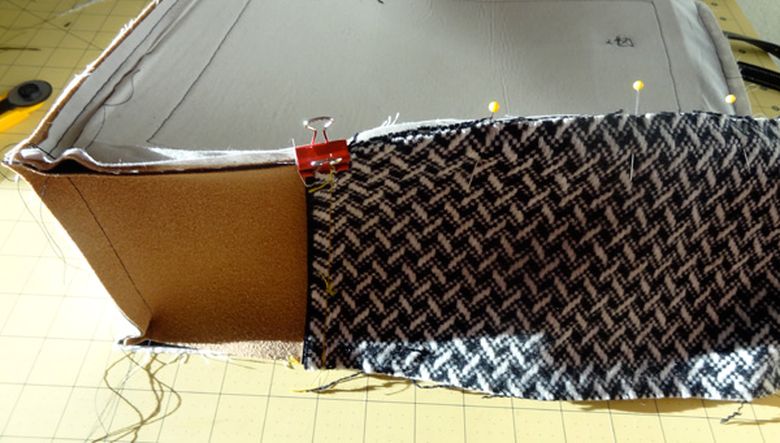
Step 2: Sew the upper front and back exterior fabric pieces to the lower front and back vinyl pieces along the 16" edge. Since you can't use pins on vinyl, binder clips work well to hold the fabric and vinyl in place, just remove them as you approach them with the needle. Once the pieces are stitched together, topstitch along the vinyl (on the right side of the fabric), just below the seam. I used my stitch-in the ditch foot for this and adjusted the needle position to the side. This allowed me to guide the fabric through in a perfectly straight line.


Step 3: Sew the upper side exterior fabric pieces to the lower side vinyl pieces along the 6" edge. Once the pieces are stitched together, topstitch along the vinyl (on the right side of the fabric), just below the seam, just as you did in step one.

Step 4: Iron the peltex front and back pieces onto the muslin front and back pieces. Position them so that they are .75" from the sides and bottom of the muslin, the top of the muslin should extend 1.5" beyond the top of the peltex when it is in its proper position. To help with proper positioning, you can draw lines on the muslin that are .75" in from the sides and bottom.

Step 5: Iron the peltex bottom piece onto the muslin bottom piece. Position it so that it is .75" from all sides of the muslin.

Step 6: Stitch the peltex to the muslin (bottom, front, and back pieces). There is no need to be orderly about this, this step just ensures that the peltex stays adhered to the muslin and doesn't flop around in your finished purse.


Step 7: Lay the muslin/peltex front and back pieces on top of the front and back pieces you stitched together in step 2. Orient the muslin/peltex pieces so that the peltex side is down facing the wrong sides of the front and back pieces. Make sure the edge of the muslin/peltex piece with the 1.5" of extra muslin is at the top.


Step 8: Stitch the front and back exterior pieces to the front and back muslin/peltex pieces by sewing around the edges with a .25" seam allowance.
Step 9: Repeat steps 7 and 8 with the bottom muslin/peltex piece and the bottom vinyl piece.


Step 10: Time to make the handles!...Fold the edges of the handle pieces in toward the center so that they meet, then fold them in half down the center so that the raw edges are completely enclosed in the fold. Use binder clips to hold the folds in place. Place the folded handle under your walking foot and adjust the needle position so that you can sew close to the double folded edge.
I found that it worked best to place my handle piece over to the side of the walking foot so that it was fully under one "toe." This allowed it to feed through smoothly. Stitch all the way down the length of the handle. I used my topstitching thread for this. Because you will be stitching through 4 layers of vinyl, I found that it worked best to only use the topstitching thread on the upper spool of my machine and use regular thread in the bobbin. You may also find it helpful to use a "denim" machine needle for this step.


Step 11: Adjust your machine/handle placement so that you can stitch down the other side of the handle, creating two parallel lines of stitching.
Step 12: Repeat steps 10-11 with the second handle piece.

Step 13: Position the ends of the handles so that they are 3.5" in from the side and 3.5" down from the top of the purse front and back pieces. Stitch them in place by sewing a small square with an "X" through it at the ends of each handle (don't make the square too big, because you want the stitches to be covered when you sew on the buttons). I back tacked the square and the "X" for extra durability.


Step 14: Follow the instructions on your cover button kits to cover the four buttons with felt.

Step 15: Hand stitch the buttons at the bases of each handle on the front and back pieces of the purse. Sew them on through all layers, including the peltex.

Step 16: Place one of the side pieces and the bottom piece right sides together with the 6" edges matching up. Use binder clips to hold them in place. Beginning and ending .5" from the edge, stitch the two pieces together with a .5" seam allowance. Repeat with the other side piece.

Step 17: Take one of the front/back pieces and, with right sides together, line up the 16" bottom edge with one of the 16" edges of the bottom piece. Use binder clips to hold them in place. Sew them together with a .5" seam allowance. Make sure to bend the side pieces out of the way so that the bottom corners of them don't get caught in your stitches.


Step 18: Repeat step 17 with the other front/back piece.
Step 19: Using pins for the fabric section and binder clips for the vinyl section, pin a long edge of one of the side pieces to the adjacent edge of the front/back piece. Stitch them together with a .5" seam allowance. Repeat with all four corners until you have formed an inside out bag. I found that it worked best to first sew the sides together at the seams between the fabric and the vinyl. This ensured that the top of the vinyl matched up at the corner seams.
Step 20: Check all four bottom corners to make sure that they are fully joined and do not have any holes where the three pieces of fabric come together. If you find a hole, re-sew the seams near the corner as necessary.
Step 21: Clip any extra fabric from each of the four corners to reduce bulk.

Step 22: Turn your bag right side out.
Step 23: Repeat steps 16-21 with the lining fabric pieces (use pins instead of binder clips). If you choose to add a pocket, sew it onto one of the front/back pieces before beginning step 17.


Step 24: Trim the excess seam allowance from the top three inches of the exterior fabric at the four corner seams. The top of the exterior fabric is going to be folded down over the lining and stitched in place, so this helps to reduce bulk.
Step 25: Place the lining fabric inside of the exterior of the bag. The lining and the exterior should have their wrong sides together (ie. when you look into the bag you should see the right side of the lining fabric).
Step 26: Fold the edge of the exterior fabric under .25" and then fold the folded edge over the top of the lining fabric so that it overlaps by 1". Use binder clips or pins to hold the folded edge in place.

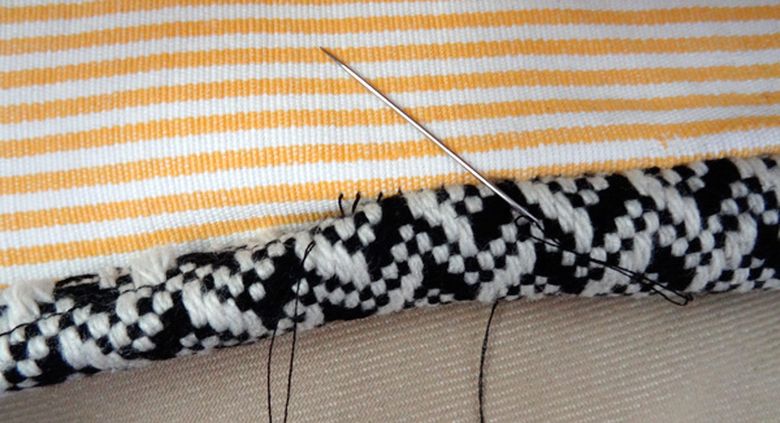
Step 27: Stitch the folded exterior fabric edge to the lining, all the way around the perimeter of the bag opening. Because of the thickness of the multiple layers of fabric, I was not able to sew this step with my sewing machine (if you use thinner fabrics you might be able to). Instead, I hand stitched the exterior fold to the lining using a ladder stitch.
Step 28: Almost done!...Pull the lining out of the bag so that it is out of the way. To create crisp corner edges on your bag, fold each corner edge along the seam and stitch 1/8" from the seam, down the length of the bag. Start stitching one inch below the top of the peltex and stop stitching when you reach the vinyl. Repeat with all four corner edge seams. Because of the thickness of the fabric, I found that it worked best to use a zipper foot for this step.


Step 29: Put the lining back into the bag. Press the top edge of the bag. While the top edge is still warm, fold in the sides of the bag creating a "V" shape. Allow the bag to cool while the edges are folded in. This step helps to shape the bag so that the sides fold inward rather than billowing out.


Step 30: Go pick out the perfect outfit to wear with your beautiful new handbag!


0 comment:
Post a Comment