
Starting this month, our city’s stores won’t be providing paper or plastic bags for free, to encourage the use of reusable bags. We’ve been getting into the habit for a while, but we will definitely need more bags.
And while I love my Roll-Up Totes, those are rather small and flat and good for trips to the craft store or drug store but definitely not for a gallon of milk. So I made some larger bags with a boxy bottom and with sturdy fabric to hold lots of groceries and larger items.

Some notes before we begin:
For sturdy bags, use sturdy fabrics. I used canvas and duck cloth. I’ll also be looking out for thrifted tablecloths or curtains made out of thick fabrics to make more bags.
This tote consists of three main panels of fabric: the front, the back, plus a long panel that makes up the side, the bottom, and the other side. I would say the hardest part of making this bag is attaching that long side/bottom panel at the bottom corners, otherwise, this bag is quick and easy to make. After a few tries, my corners looked a lot better!
The bag is unlined, which leaves raw edges inside. I used French seams to finish the edges, which also added some stiffness and structure to the bag. The French seams go around the bottom corners as well, which was also difficult to sew. But with a few tries and tweaks, it got easier as well.
When you sew along the curves of the bag, you will be sewing at a very small seam allowance. This is to avoid any creases in the fabric, which you will see in steps 8 and beyond. If you sew at a larger seam allowance along the curve, you will sew over creases that formed when curving the fabric. I did try clipping the corners. That didn’t work. I also tried making neat creases uniformly on all four corners. That looked ugly.
Feel free to make the bag in any size you wish. See notes in step 4 if you do this.
Personalize your bags by mixing fabric prints, or paint/applique them. In this tutorial, I’ll be making the red striped one. I also appliqued one with some random shapes of printed cotton fabric scraps, and I made another bag out of a table runner I had stenciled a long time ago but never used.

Supplies:
Heavy material such as canvas or duck cloth, cut in the following dimensions:
Front and Back Panels: 12.5×13 inches (cut 2)
Side/Bottom Panel: 8.5×34.25 inches: (cut 1)
Straps: 4×47 inches (cut 2)
Iron and ironing board
Rotary cutter, ruler, self-healing mat, fabric scissors
Sewing machine, heavy duty sewing machine needle, thread, pins
Optional: Supplies to decorate fabric (paint, applique, etc).
Directions:
Step 1. Cut out all of the pieces to the dimensions above. In this tutorial, I used the red striped fabric for the Front and Back panels. The side panel and the straps are in the plain canvas fabric. First step is to hem the edges of the front/back panel. Fold over one of the 12.5 inch edges 1/2 an inch and press. Fold it over again another half an inch and press. Sew down the edge. Repeat with the other panel. This hemmed edge will become the top of the tote.
Note: If you are going to embellish the tote, you can do it now, but the straps may cover your design. So you could also wait until after you affix your straps to add your design.

Step 2. Take a strap and fold it lengthwise in half. Press a crease. Open it up and fold both of the long sides in, so they meet in the middle, and press. Finally, fold one side over the other down the middle and press it flat. A 1-inch wide strap should result. Repeat with the other strap.

Step 3. Now attach a strap to each of the Front and Back panels. Measure two inches from the sides and lay one end of the straps down so that it sticks out about half and inch on the bottom (this is in case it slips or anything, you have some wiggle room). I had the “open” side of the strap facing out towards the hem, then I looped it around, making sure the open side was still facing outward. Then I laid it down along the other side, at two inches as well, and with the other end sticking out a half inch. Pin in place.

Step 4. Starting at the bottom, start sewing the strap to the panel. Sew the “open” side of the strap first. When you get to the top of the bag, just keep sewing the strap all the way around, closing up the strap. Then, you’ll come around the top of the bag again. Keep sewing down the strap to the bottom of the bag. Repeat with the folded side of the strap to sew down the strap completely.

Step 5. Hem the two short sides of the Side/Bottom panel in the same manner as you did with the Front and Back panels. These edges will line up with the edges of the Front and Back panels that you just hemmed.
Note: If you are changing the size of the tote, you will need to adjust the length of the Side/Bottom panel. To estimate the size you’ll need, multiply the length of your side panel, multiply that by two, and add the width. Then, just hem one side. When you’re pinning the Side/Bottom panel to the Front and Back panels (which you’ll see in a few steps), you may have some excess. Cut it down to the size you need (including 1 inch for the hem).

Step 6. Pin the Side/Bottom panel to one of the Front/Back panels, right sides together. The top hem of the bag should line up with one of the end hems of the Side/Bottom panel. Start pinning down the sides until you get to the first bottom corner.

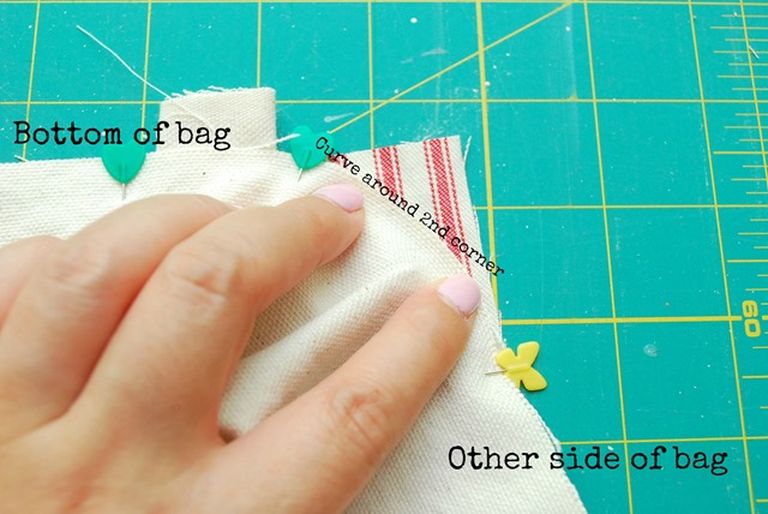
Step 7. At the corner, curve the side panel along the corner and pin. The corner of the red fabric (i.e. the front/back panel) will be sticking out. Just make sure the curve is even, and try not to make too many creases in the fabric (when you sew, you don’t want any creases).

Step 8. Pin along the bottom of the bag until you reach the other corner. Do the same thing with that corner, and pin along the remaining side edge. The other end of the side/bottom panel should match up with the top edge of the Front/Back panel.
Note: If you changed the size of the bag – remember how I said to just hem one end of the Side/Bottom panel? Here’s where you might have excess length, so here you would cut it down to size, including an extra inch for hem.
Step 9. Start sewing the side/bottom panel to the front panel at a 1/2 inch seam allowance. As you approach the curve, start decreasing the seam allowance.

Step 10. Sew around the curve, right at the edge of the fabric. Sew slowly, making sure you sew through both fabrics. There will be creases in your fabric; use your fingers to flatten them as much as possible, and don’t sew over the creases. You want it to be smooth.

Step 11. After you sew the first curve, sew along the bottom hem. Keep the same small seam allowance, making sure you are sewing through both fabrics. Sew around the curve with the same small seam allowance, just as you did with the first curve, pressing down the creases with your fingers. Start sewing up the other side. Gradually increase your seam allowance back to 1/2 inch. If you like, you can sew over the curves and bottom edge again to reinforce them.

Here’s a peek at one of the corners. The Side/Bottom panel (plain fabric) is smooth and doesn’t have any creases in it.

Step 12. Now attach the other Front/Back panel to the Side/Bottom panel. Pin the other Front/Back Panel to the other edge of the Side/Bottom panel, right sides together. Make sure the Side/Bottom panel is on top as you will need to watch how you sew the curve. Sew the curves in the same manner as before.

Step 13. Check to make sure you sewed through both layers of fabric, i.e. there aren’t any holes in the seams, particularly at the corners and bottom where the seam allowance is small. If you missed any spots, go back now and correct it. Trim the seam allowance to a scant 1/8 inch along the side of the bag, so the raw edge will be completely hidden when you sew the French seam.
Your seam allowance was already small at the curves and bottom seam, so you don’t have to trim off much. You can use your rotary cutter and straight edge to trim off the seam allowance, but I am eyeballing it with scissors. I felt like I had more control with my scissors than with a rotary cutter.
Note: Usually, French seams are sewn on the inside of unlined garments to hide the raw edge of the seam. In this bag, the French seam is decorative so it is on the outside of the bag, while hiding the raw seams on the inside of the bag. If you haven’t sewn a French seam, just do a search on YouTube and you should find some good tutorials. Practice on scrap fabric first.

Step 14. Press the seams flat, paying particular attention to the curves and bottom seam.

Step 15. For the French seam we are going to again start at the top of the bag and gradually decrease the seam allowance to go around the curves and the bottom of the bag. This time, I’m using a pin to mark about 1.5 inches from the start of the curve, so I have a place to “aim” as I gradually decrease the seam allowance. Mark the other side of the bag as well, to mark the point to gradually start increasing the seam allowance again back to the top of the bag. Start sewing the French Seam at the top of the bag, at a 5/8 inch seam allowance.

Place a pin on the other side to mark where you’ll gradually increase seam allowance back to 5/8 inches as you approach the top of the bag on the other side.

Step 16. When you reach the pin, your seam allowance should be decreased to no more than 1/2 an inch. As you go along the curve, you will be sewing right next to the seam. Keep going at this small seam allowance along the bottom and the 2nd curve.

Step 17. Start gradually increasing your seam allowance. When you reach the pin, you should be at around 1/2 an inch. As you sew up to the top edge of the bag, you should gradually increase to 5/8 inch.

Step 18. Check to make sure all of your raw edges are hidden in your French seam. You’re done! You now have a sturdy shopping bag with a flat bottom, great for carrying lots of groceries. If you like, you can take out the plastic bottom from one of your store-provided reusable bags, particularly if your bag has seen better days. Put it at the bottom of your new bag to provide further strength to your bag. Or, you can use an old plastic placemat or one of those thin plastic cutting board cut down to size with a utility knife.

Just trying out my bags. I’ve got two big bottles of juice in one, with plenty of room to spare. The other one has two big glass jars.

I’ll be making a few more, and along with the store-provided ones we already have, we should have enough for grocery shopping. Sometimes I grow weary of mismatched grocery bags, so it will be fun to have a coordinating set to brighten my shopping trips. They fold flat very easily and I’ll be storing them in this thrifted fabric box in the trunk. Now I just have to remember to bring them into the store!

I know the curve part might be a bit difficult, but honestly, after a few tries, it gets much better. I sewed these three bags after trying one with a thrifted bed sheet for practice and worked out all of the kinks (I recommend doing that as well if you want to practice first before using your good fabric).
Anyways, the three bags took me about an hour each. There isn’t much cutting and just a little bit of pressing. It’s mostly just figuring out those corners. I was about to give up, but now I have three cute but sturdy bags, and I can’t wait to make more!


0 comment:
Post a Comment