
See, working out how to sew three dimensional objects can be really difficult. Originally I wanted to make an heirloom zucchini as one of my squashes and a banana peel seemed like it would help me figure out how to design the curved edges.

After a lot of finagling I realized that a fabric zucchini just wasn't cute..haha. However in the process, I did come up with some REALLY cute bananas!

Another advantage to having a bunch of bananas as pincushions is that you can keep each different type of pin or needle on a separate banana.
Little man even has tried to claim the bananas as his own!
MATERIALS
Scraps of three different fabric prints (about 1 fat eight of each fabric to make 5 bananas).
Matching thread
Poly Fil, emery sand
Hand stitching needle
PATTERN PIECES-download
DIRECTIONS
1. Cut out the banana pieces from the pattern provided. Trace them onto the top of your fabric scraps right side up. Trace each piece onto it's own fabric print.

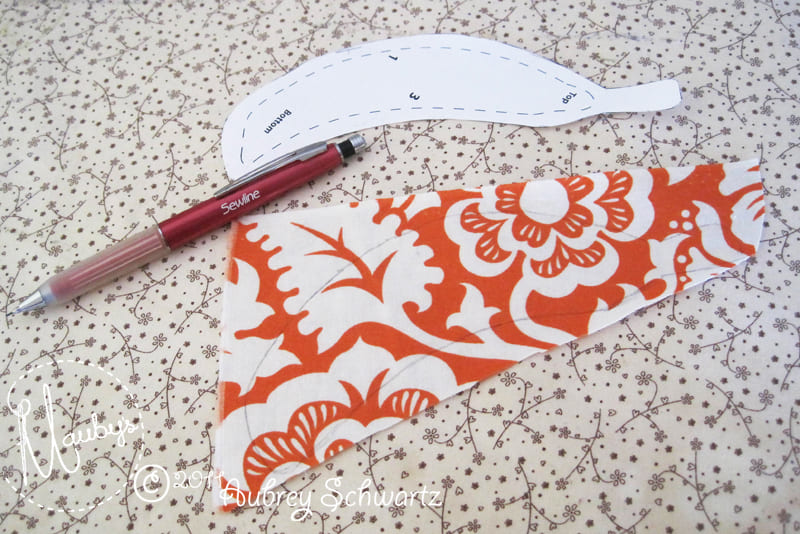
2. Keep the pattern pieces by it's fabric print after cutting it out.

3. Write the corresponding numbers on the pattern onto the BACK of the fabric prints.

4. With right sides together, line up the edges labeled as #1 and pin around the entire edge. You may have to stretch one slightly and turn the fabric a bit, since the edges turn in different directions.


5. Sew the #1 edges with a 1/4" seam allowance.

6. Repeat steps 4 & 5 with the #2 edges.


7. Now the three pieces are attached and you have just the #3 seam left. Pin the edges together and remember to leave a 1" turning gap near the center of the seam.

Sew all the way around the curve, finishing off the bottom edge of the banana.


8. Turn fabric right side out through turning gap.

9. Stuff banana with some emery sand and poly-fil or just poly fil. Leave the top of the banana unstuffed, that way it will really look like a banana stem.


10. Close off turning gap with a slip stitch.
11. Repeat steps 1 through 10, four times so that you end up with 5 bananas!

12. We will be arranging the bananas in a bunch just like a real set of bananas!
Take three bananas and line them up side by side.

13. Starting in the right side of banana farthest to the right put the needle and thread through about 1/2" down from the end of the stem. Pull the needle through to the other side, then gently tug the knot through ONLY the right edge.


14. Pull needle and thread through the next banana at the same place, then push it back through the first one and back through the second one again.


15. Sew on the third banana in the same way.

16. Repeat the method of sewing the three bananas together with the two bananas that will rest on top of the three. Then in a similar fashion, sew the two bananas to the tops of the three bananas.

Voila! Some more fruity pincushions to add to your collection!


0 comment:
Post a Comment