
This simple bag is not as simple as it looks on first sight. The clever way the strap is connected makes sure that the bag closes automatically when picked up.
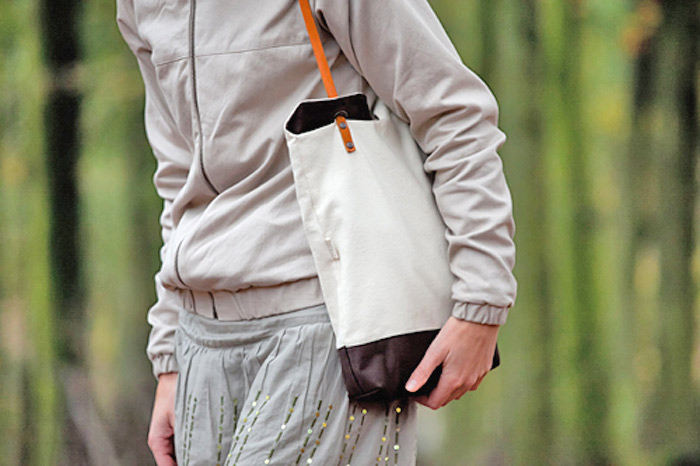
The combination of white canvas with a dark lining and a dark bottom not only gives a very graphical aesthetic, it also protects the bottom of the bag from getting dirty.


The size of the bag is approximately 30 x 40 cm or 11.8 x 15.7 inch. Enough for some everyday essentials. I like to use contrasting colors, but since this is a pattern you can choose your own combination. You can even use thin leather for the bottom part, to give the tote that luxury twist.

When I designed this bag, I wanted to integrate the grip/straps in a more functional way with the rest of the bag. I experimented with different methods of holding and closing the bag, which resulted in a bag that closes automatically when you pick it up. I just created a clever way to connect the leather strap to the bag.
A friend of mine called it a “yin yang bag,” which is pretty accurate, I think. The graphic use of white and dark brown fabric is not only an aesthetic choice; the dark-colored bottom makes stains less visible.


Materials
White cotton canvas (30 x 82 cm; that includes the seam allowance)
Dark brown fabric (or another color if you prefer that) for the lining (30 x 82 cm)
Dark brown fabric (30 x 18 cm)
Leather strap for the handle (12-mm wide, 70-cm long)
4 small rivets to connect the leather handle to the bag
2 large eyelets with a hole diameter of 14 mm (if you can find larger ones, you can use a broader strap, too)
Tools
Hammer
Sewing machine
Scissors
Pins
Chalk
Measuring tape
Iron
Pattern template
Instructions
1. First, cut two large pieces of fabric according to the pattern.

2. Pin the small piece of dark fabric to the white canvas. Make sure it’s exactly in the middle, because this will form the dark bottom once the bag is finished. I used the iron to create a sharp straight fold in the edge of the brown fabric before pinning it to the white fabric.

3. Sew together.
4. Fold the lining (the large piece of dark brown fabric) in two and stitch the side edges together. Don’t forget to leave a small part somewhere halfway unstitched. You will need this hole later on.
5. You now have a very flat bag. To create volume, you need to give the bag sides by stitching the lower corners together. To do this, open the bag and place the two side seams on top of each other. You will create a triangular fold, with the two corners now forming two triangles on top of each other.

6. Mark where you want the seams with the chalk and stitch each corner.

7. Repeat these steps with the white fabric. Make sure to turn the pretty side (the one that will become the outside) inside. When the bag is finished, all seams will be invisible between the lining and the outside. That’s the point of using a lining, apart from the pretty contrast when the bag is finished.
8. Put the lining inside the outer fabric. Make sure that the good sides, the ones that will eventually be visible, are positioned against each other. I kept the white canvas just as I had when sewing it and turned the brown lining inside-out before putting it in the white part. If you did it right, you will see the seems of the white canvas on the outside. The brown lining is inside it, with the seams visible when you look into the bag.

9. Stitch the edges together around the bag.

10. Now the really fun part: Pull out the lining and look for the hole you left open in one of the side seams. Through this hole you can pull the whole bag inside out until it is completely reversed and all of the seems have become invisible. Use the iron again to flatten the edges and the side seams. The sewing part is done!


11. The last step is to add the eyelets and connect the strap to the bag. Eyelets and rivets usually come with some tools to make the right holes in the fabric and to keep their form when hammering them into place. Add one eyelet to either side of the bag, in the middle of each flap.

12. Stick the leather strap through one of the eyelets and connect it with two rivets to the opposing side of the bag. Do the same with the other end of the strap.

Finished!


These are bags made by this pattern


0 comment:
Post a Comment