
DIY Easy Zippered Box Pouch Bag Free Sewing Tutorial


Materials Needed
(20) 2.5″ squares (this is a nice way to use scraps up) in this example, I cut up a pack of (20) Echo by Lotta Jansdotter charm squares and had enough squares to make two boxed pouches plus an iPad case (!!)
(2) pieces of solid fabric 1.5″ by 10″ for border
(2) pieces of solid fabric 1.5″ by 12″ for border
(1) zipper at least 10″
(1) piece of batting 12″ by 14″
(1) piece of fabric 12″ by 14″ for the interior
Use what you have on hand. That random charm pack you only got one of? Chop up the pieces into quarters. Scrap bucket over flowing? Dig into it. Pick a contrasting strip of solid for the border (I had leftover Kona Espresso from a quilt border and I just ripped 1.5″ strips to get my border pieces). Pick out a cool zipper and as long as it is longer than your fabric piece, you are fine. I only buy 14″ long zippers. I can use them in garments and also in pouches.

Cut your fabric so that you have (20) 2.5″ squares. Arrange your squares into a grid that is 4 x 5. I used a pack of 20 charm squares and had enough for two pouches and an iPad case. This would be a good scrap buster as well.

The most efficient way to sew your squares is to chain piece them. Imagine your grid of squares is numbered starting in the top left corner and working across and then down so that the bottom right corner is square number 20. Place square 2 on top of square 1 with right sides together. Stitch them together using a 1/4″ seam.
Instead of pulling them off your machine, when your needle is just a stitch of two from the end, stop and get your next pair of squares which would be squares 5 and 6. Place square 6 on top of square 5, right sides together and place them under your presser foot. You will have a 1/4 inch or so gap between the two pairs of fabric.

Continue in this was until every pair has been sewn together. When you finish the first column of pairs (squares 17 and 18) start at the top of the next column.

When you are finished you will have ten pairs of squares in a little chain.

Snip the bit of thread between each pair and lay your pairs back out in the right order. I do this from the last pair to the first, again making two columns.

Now, sew your pairs of pairs together. Open up your first two pairs (squares 1 and 2 and squares 3 and 4). Place them right sides together and sew a 1/4 inch seam connecting squares 2 and 3.

Repeat this for the four remaining pairs until all five pairs are in a chain.

DON’T SNIP. You will need to press your seams at this point. If you leave your chain connected, you can press seams and then return your piece to your sewing area in the right order. Press each row of seats in the opposite direction to reduce bulk. You can open all the seams if you want, but it is not necessary.

It is now time to sew each row together. Once your fabric is laid back out, snip the threads. Take the first two rows and place them right sides together. Pin at the junction of each seam, trying to line up your corners the best you can. Sew this row. Repeat with the next two rows.

Next, sew together the two sections you just made, being careful to line up the corners and pin. Finally, take the last row and sew it on. All stitching should be done using a 1/4″ seam.

You know have a completed patchwork grid. Press all seam.

It is time to attach the border pieces. I used some Kona Espresso that was left over from a quilt binding. These pieces were 2.5" and I ripped them in half, so they were 1.25". I think it might be slightly better with pieces that are 1.5" but use what you have on hand.

I typically have ripped pieces that are slightly longer than what I need. After I stitch them on, I snip off the extra bit of fabric so that everything lines up evenly.

Attach the border pieces to the two shorter edges first and then the two longer ones.

Once the entire border has been attached, press your seams a final time. You should have a piece of patchwork that is roughly 9.5″ x 11.5″. It does not have to be perfect as it will get trimmed down to size after quilting.

Find a piece of batting that is roughly 12″ x 14″. I always have tons of left-over strips from making quilts and I sewed two together with a zig-zag stitch to make a piece that was the right size for this project.

Make a “quilt sandwich”. To do this, first lay down your interior fabric wrong side up. Then place your batting on top of that fabric and finally, place your patchwork piece right-side up. Smooth all the pieces until there are no wrinkles. I use the snip and rip method to cut my interior fabric. Simply snip about an inch into your fabric and then rip it. Since it is woven, it will rip in a straight line. This is Heath in grey by Alexander Henry.

You can then baste your piece using safety pins, basting stitches, or spray basting. Since this is such a small piece, I used safety pins.

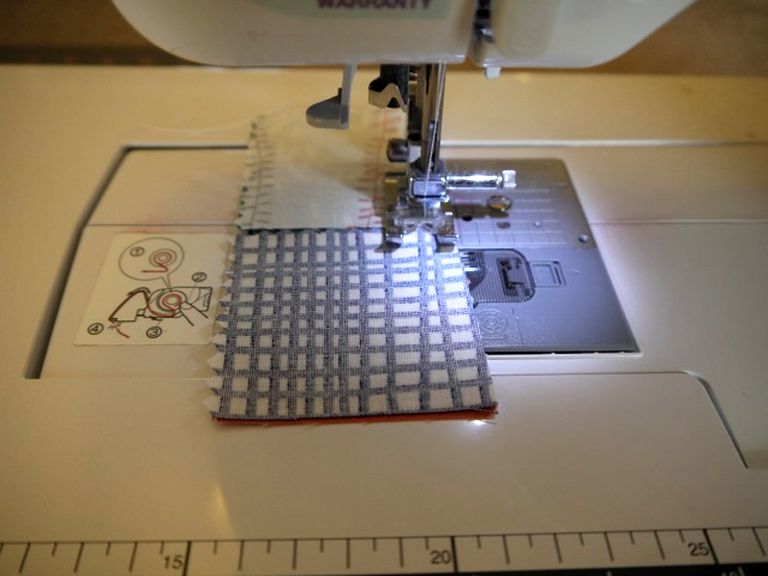
If you have a walking foot, attach it to your machine. If you don’t have one, and your machine can take one, I highly recommend you get one. It is a wonderful foot and makes sewing through thick layers so much easier. I quilted my piece using 1/4″ spaced lines running the long way of the fabric. I used the edge of the walking foot as a guide for my line spacing. You can quilt this any way you want.
If you are going to make a wider pouch, it works best to quilt in the long direction, meaning your lines run through five squares like in the picture. If you are going to make a narrower pouch, you might want to turn the piece 90 degrees and quilt in the shorter direction, through four squares. It really all comes down to what is more aesthetically pleasing to you.

When you are quilting, start your stitches in the batting section and work down to the end of the piece. When you reach the end, snip the thread and bring the fabric back to the top. Repeat this process until you have quilted the entire piece.

Once your piece is quilted, use a rotary cutter and ruler and trim it to 9.5″ x 11.5″. Of course, if you want to make a bigger or smaller pouch, you can scale your piece accordingly.

Here is the exterior, all quilted and ready for the zipper to be attached.

This is the interior, I used Heath in grey by Alexander Henry.

Inserting a zipper takes practice and patience. You also need a zipper foot for your machine. If you have never inserted a zipper, you may want to practice a few times.
Make sure your zipper is at least as long as your work. I prefer to work with zippers that are a little longer and just snip off the excess. Decide whether you want a narrow pouch (like a pencil case) or a wider pouch. In this picture, I made a narrow case. With your fabric exterior side up, place your zipper right side down (look at the zipper, it has a right side (the side that faces out) and a wrong side just like fabric).The zipper pull is on the left.
*Note that in the picture, the zipper is right-side up and with the pull on the right. I am sorry, I think I meant to just show the color of the zipper in this pic. Just make it look like the opposite of this picture. You can scroll down to the picture with the blue zipper on the top of the fabric to see the correct orientation.*

I always baste my zippers in place. It only takes a minute and I find that it actually ends up taking less time since you don't have to stop and remove pins while sewing.

This is how I put in my zipper. The zipper is to the left, the zipper pull tab is towards the bottom, the fabric to the right, and the zipper foot is sitting on what will become the "seam". I set my machine to the "zipper" stitch and just stitch very slowly staying very close to the zipper teeth.

Check your work and make sure that it looks correct.

Fold your piece together so that the right sides are facing. Line up the side edges and pin the edge of the zipper to the edge of your fabric.

Once again, I basted my zipper in place. I sewed this side just like the other, with the zipper to the left and the fabric to the right.

If you wanted to make a wider pouch, you would attach the zipper to one of the shorter ends and follow the same procedure as previously described. Not that in this picture, the zipper is oriented correctly, with right sides together and the zipper pull to the left.

If you want, you can also top-stitch your fabric once the zipper is installed. This adds a nice finished touch and can help keep the zipper laying nice and flat. Alternatively, you can also zig-zag stitch the interior edge of the zipper and pouch to keep it from fraying (see below for example).

Now that the zipper has been installed, it is time to close your pouch. MAKE SURE to open your zipper a few inches so you can turn your pouch right side out when you are done. Carefully pin your edges together so they line up. Note that I have switched back to my walking foot. Since there are multiple layers, this foot is the best for smooth stitching. Stitch with a 3/8" seam.

Once both sides have been stitched closed, you can snip off the ends of your zipper.

Then, use a zigzag stitch over the ends of your pouch to keep it from fraying.

Turn your pouch right-side out. This is what it looks like at this point. A flat pouch. You could just stop here, but I think boxing it makes it more usable.

Here is what the wide pouch looks like after both ends have been sewed together, but before snipping off the extra zipper bits.

Wide pouch before boxing.

Boxing the corners is simple. Turn your pouch wrong side out. To make the bit you will stitch to box it, pinch the corners from the seamed edge to the folded side. This will make your pouch "puff". Measure about 3/4" from the tip of the corner and draw a line running up and down. Or, you could be like me and just kind of eyeball it. Do this for all four corners. You might want to make the boxed corners on the wider pouch a but bigger, more like 1".

This is what the corners look like once they have been boxed. If you want, you can snip off the tips and zig-zag the edges. I just left mine and finger pressed them in.

Turn your pouch right side out and enjoy!

Here is the bottom of the pouch.

All zipped up.

Here is the bottom of the wide pouch. And another view from the top.

Here is a set of pouches I made from one 20-piece charm pack, some scraps of Kona Espresso, about 1/4 yard of Heath, a bit of scrap batting, two zippers, one button, and a few hours!


Thanks for writing this up! The bags are so great! I made a lot of pouches, but hadn’t ever veered into the “quilted” bag arena. I have TONS of batting scraps, though and love the look of the straight line quilting!!!
ReplyDeleteMy eyes went crossed as I read the dimensions of the fabric, lol. I never measure or even sketch my designs first (something all my art teachers hated, lol) . I just go for what I know. Thus… LOVED the “organic” instructions! These would make great lightweight travel pouches. I took a Caboodles on my last flight and went over the max weight by 7.5 lbs! lol. This is a grand idea, and I thoroughly appreciate this! If my sewing machine doesn’t magically start working tonight, I will be stitching by hand. What fun! =) Thanks again!!!
ReplyDelete