
This tutorial will take you through both for making the purse pattern and making up the purse itself for a 6” x 3” glue in frame. All seam allowances are ¼” throughout.
You will need to draw out your own pattern, as all frames differ so much, my method is great for those who no longer have that old school maths set! It does not require a protractor or working out of pesky angles but it is specific for the 6” x 3” frame from the Village Haberdashery, you may find that this fits other frames of the same size, you could also adapt it to fit different sized frames.
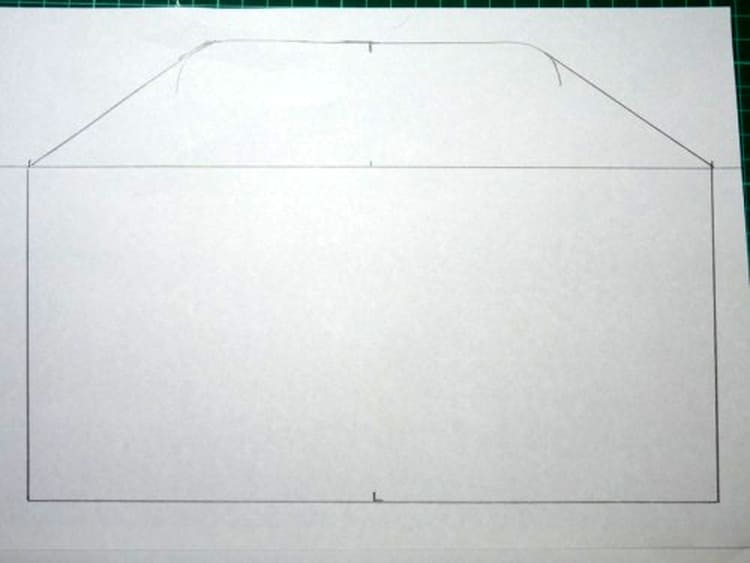
Start off by drawing directly around the top edge and shoulders of your frame

Find the centre of the frame and mark

Measure down 7” from this line and mark

Line up the 5” on your ruler with this mark you have just made, draw a line from 0-10”

Draw a line vertical to the top frame line, 2” down from it, transfer the centre mark too.

Line up the 5 ¼” on your ruler with this centre mark you have just made, make marks at 10 ½ and 0”

Join up the marks you have just made with the bottom line

Extend the shoulders at the apex of the curve to meet the marks too
Mark the end of your hinges on the pattern by lining the frame up (add on seam allowance of ¼” plus a little for ease)

Okay, so now you have your pattern, albeit a little messy! I like to flip mine over and make it look all swanky and professional! (make sure you transfer your hinge markings)

That’s your pattern drafted, now onto the purse construction…..
Cut:
2 from lining fabric, 2 from batting, 2 from outer fabric (can be pieced if desired)
Quilt outer onto wadding as desired.
With right sides together sew outer pieces around the two sides and bottom edge, starting at one hinge mark and ending at the other (luckily on this pattern the hinge marks sit right on your ¼” seam allowance making this nice and easy). Repeat with lining pieces.

Now we are going to box our bottoms to make our purses stand up all by themselves and make them nice and roomy and easy to see into when you are hunting for those pennies!
Get hold of one of your corners and wiggle it so that the side and top seams are sitting together, forming a point

Finger press your seams open and measure 1” up from the tip of the point, making sure your ruler is lying straight along the seam, mark.


Sew along this line (making sure to back stitch at the beginning and end) and trim the corner to a ¼” seam allowance. Repeat this until you have done all 4 corners (2 for the outer and 2 on lining)

Turn the lining right side out, slip inside the outer and pin in place along the raw edges.

Sew along this edge MAKING SURE to leave a gap of around 3” for turning though (again back stitch at the beginning and end)
Turn through and push out corners, slip the lining inside the purse body and press carefully, remember to press the seam on the opening inwards. No need to stitch this closed as it will be hidden inside the frame once glued.

Now you are ready to glue!
Do one side at a time, leaving plenty of drying time before attempting to glue the second.
Run a thin line of glue all around one side of the frame, try and get right down into the base, starting and stopping just before the hinges. I find that as you push the fabric in the glue can seep out here and run onto the hinges so leave a little gap at the beginning and end and it should prevent this.

Now wait a while before pushing the fabric in, it helps to make the glue slightly tackier, holding the purse better as you push it in.
Starting in the middle, push the fabric into the frame, small embroidery scissors are my go-to for this job! I work from the outside of the purse, I find that if any glue does seep out it tends to go onto the lining side if I do it this way.
Work your way along the frame, bringing the corners and then the sides in. Go around again making sure the purse is seated right up inside the frame (give it a good push in!) and is lined up correctly, do this now before it dries!

Now go and make a cuppa, pop to the shops, do some blog reading but just leave that purse alone! Nothing worse than the first side coming out whilst you are trying to glue the second.
When you are sure it is dry, repeat the gluing process with the second side. I recommend leaving your purse a good 24-48 hours if you can before using it, I know it is tempting to show it off immediately but you need to give that glue a chance to really set.
Don’t panic if you have any glue seepage! Acetone and a lint free white cloth is your friend, rub a VERY small amount of acetone onto the frame and it will remove the glue…this should also work on fabric but be careful as it may also remove some colour (I have used it successfully before).
Congratulations, now off to the shops you trot to flash your purse! Of course these are really roomy so I love to use mine to hold toiletries for trips away or even hand sewing projects!


0 comment:
Post a Comment