
Once you know the technique of how to make one - you will quickly be able to make one of pretty much any different size using the same method.

Ingredients...

This tutorial assumes knowledge of "patchwork piecing" - if you don't know how to piece,
you can simply substitute the patchwork front for 1 piece of printed fabric...
To make this pouch you will need:
1 x bits of plain fabric for the outer back side of your pouch measuring 10.5inches wide x 7.5 inches tall (if you don't want to make your pouch patchwork then simply cut 2 this size - otherwise cut the next bits for the patchwork)
6 x colourful strips of fabric 4.5inches wide x 1.5 inches tall
1 x feature fabric strip 4.5 inches wide x 2 inches tall
2 x plain fabric strips measuring 3.5 inches wide x 7.5 inches tall (I made them a little wider than needed then trimmed down)
2 bits of fabric for the lining measuring 10.5inches wide x 7.5 inches tall
2 bits of iron on interfacing or fleece (you can omit this step if you don't have it - the interfacing just gives the pouch a bit more structure - without it it will be fine, just very soft)
2 bits of fabric for the zip tabs measuring just over the width of your zip (I cut mine 2 inches x 4 inches then trimmed down later)
1 x 8 inch zip
To make your pathwork front sew all of your coloured strips together on the longest side using 1/4 inch seam & iron all the seams to one side:

** TIP: The bottom strip will get hidden on the bottom of the pouch
- so don't use your favourite strip...
Now add your 2 outer strips to the long sides of this block using 1/4 inch seam & wallah, you now have your patchwork front!
Obviously you can design any patchwork blocked front you like - it just has to measure the same as you back, lining, interfacing etc...!
Next we will prepare the zip:
To make the pouch a little more attractive (and because I didn't have a zip long enough for the zip I wanted) I have added zip tabs. These are super easy.
Find your 2 pieces of fabric for the tabs. Iron in each short side about 1/4 inch. Then fold the piece in half & iron. Like this...

Repeat for the other tab.
Now we can attach them to our zip. For this & the next step you will need your zipper foot.
I'll show you how to attach in photos... it's much easier to explain!..

Once you have finished it should look like this:
(although I'm sure yours will be sewn a lot neater!)
If you are using iron on interfacing now is the time to iron it on..

We're now ready to sandwich our purse to attach our sides to the zip. Are you ready ;) You can do this!
** NOTE: I have discovered (through error not trial) that it is vital to lay your fabric in the correct order, otherwise the lining ends up on the outside & the outside becomes the lining (doh!) so if you don't want to have to unpick just be a little careful here and lay your fabric in this order...
1) Lay your lining fabric right side up on the table
2) Place your zip face up with the zip pull at the right hand side...
3) Lay your outer fabric wrong side up on top (so right sides of lining & outer face together)...

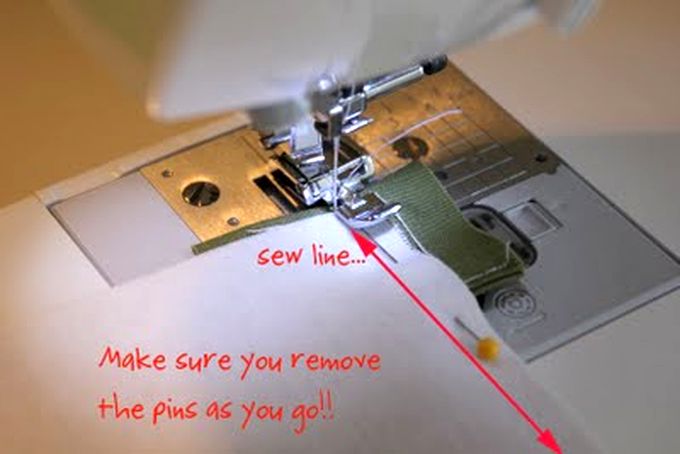
Pin your sandwich together taking care to keep all the top edges lined up neatly...

Now we get to sew!!
We want to sew the pieces together using our zipper foot - quite close to the teeth, but not so close that the fabric gets caught in the zipper when you use it!
The trouble is that at this point you can't actually see the zip - so I usually set my needle in a position so that I have the right edge of my zipper against the edge of my fabric (effectively 1/4 inch seam) like this...
Once you have sewn it, flip open your pieces of fabric so that the right sides each face out & admire your work...

Press the along the zip (being careful not to melt the zip if it is plastic) so that your new seam is sitting nice & flat.
Now we can repeat the sandwich...
This time we place them in the following order:
1) Place lining fabric right side up
2) Place the zip sandwich that you just made so that the top edge of the lining & the top of the zip match (the right sides of the lining should now be together) with the zip pull now at the left...

Place your left over outer piece right side down on the top (so right sides of the outer fabric should be facing each other) with the top edges all lined up & pin as you did before.
Sew exactly the same as you did before.
Open up, admire & press again along the new seam.
Now it should look roughly like this:

Next we want to topstitch along the zip, about 1/8th inch away from the fabric edge. This just gives it a bit more of a polished look...

Repeat for the other side...
Yay, we're ready to sew all the sides together!!
*** But before you do anything else - please open your zip half way!!
(I put this red & in bold because I forget nearly every time - and it's a jolly nuisance to turn the pouch if you forget this step)...
Ok, phew, we remembered to open the zip (just!)... now we need to flip it again so that the right sides of the outer fabric are together & the right sides of the inner lining fabric are together. We then want to make it sit as flat as possible with all the corners & edges lined up (hopefully) and pin it all together...

Ready to sew?
We want to start sewing about 2.5 inches away from the bottom right hand corner of the lining. Hmmm... it'll be easier if I show you...

Make sure you reverse your stitches at the beginning to make them nice & secure (I reverse a few extra times at the beginning & the end of this part) and using a 1/4 inch seam sew until you get 1/4 inch away from the bottom & stop.
Put your needle down, lift your presser foot, swivel your pouch so that it is now lined up for you to sew down the next side...

Rinse & repeat for the next 2 sides.
(**Just take great care when you sew over the zipper part that you don't sew over any of the metal teeth... that would not be pretty!!)
When you get to the last side (the side which you started on) stop sewing about 2 or so inches into it & double reverse securing the stitches. This should leave a generous opening of about 4 inches. We need this opening to turn the pouch right way out later!
If you would like your pouch to be more like a wallet/pencil case type case, you can skip all these next steps and go ahead to turning & finish it.
If on the other hand you would like a flat bottomed case like the one I've sewn then follow all the next steps...
To make the bottom flat we need to take 1 of the 4 corners (lining or outer - it doesn't matter) and pinch it so that the side seam & the bottom seam are flat together... we then want to draw a line with pencil or chalk 1.5 inches from the corner of the triangle & pin on either side.
Lost? Cause I was when I read that part in another tutorial!
Don't worry... I'll show you... It's actually really easy!!

Be careful that your seams are exactly on top of each other though - otherwise it will make your bottom a little crooked.
Next sew down your pencil line - again make sure that you really secure the beginning & ending stitches really well & go right to the edges.
Trim off the excess with your scissors to 1/4 of an inch...

Repeat for the other 3 corners.
Nearly there!!
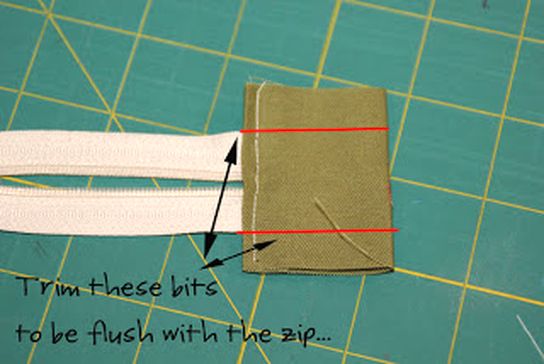
We are almost ready to turn the pouch right side out. But before we do just take a look at each end of the zipper. Do your zipper tabs overhang with the edges of the sides of your pouch? (as in - do you have excess fabric there). If so then just trim it so that it's flush with the sides. Otherwise your corners won't poke out nicely...

Carefully turn your pouch right side out by slowly pulling it through the hole in your lining...

Once turned pull your lining out and lay the whole pouch flat. We are really almost done! We just need to press the lining in 1/4 inch at the gap so that the bottom seam is all straight & we can sew it shut...

To sew it shut you have 2 options... you can hand sew it using an invisible ladder stitch. Or if you are lazy like me and like a quick fix, you can sew along the edge about 1/8th inch or as close as possible to the edge. If you do this though just make sure that your edges are really flush (unlike mine were in this pouch) - you may want to pin - so that you are picking up the front & back together.
Poke your lining back into your pouch
Press if required to get out the creases from turning
and give yourself a pat yourself on the back - you just made a patchwork zipper pouch - go you!!
Stand back & admire your work...

lovely zipper ends

pretty patchwork front & lining

Nice flat bottom... ((heh... sorry I'm very childish!)
There are lots of different options to jazz it up even more and put your own spin on it. Hope you enjoy making one.


0 comment:
Post a Comment