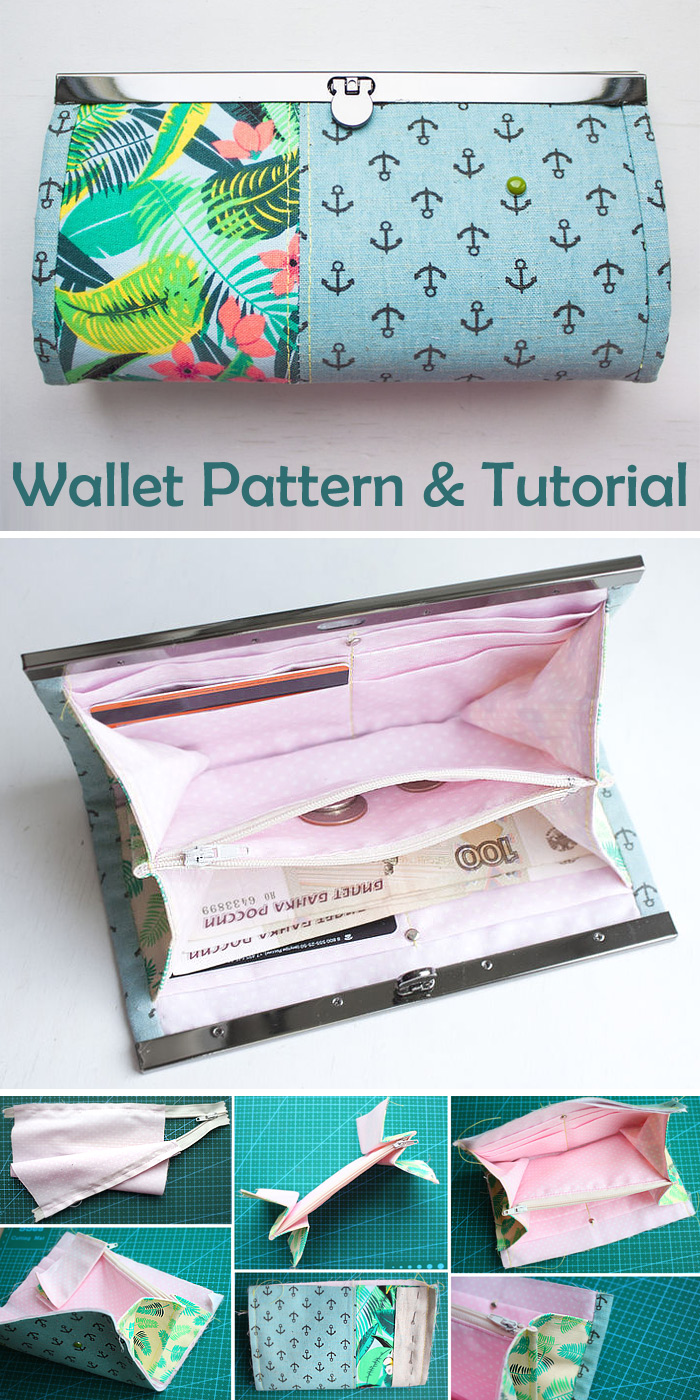
How to sew a purse with a flat lock. Free Sewing Tutorial.
A practical and effective accessory, quite simple to manufacture.
It will be necessary for us:
fabric for an external part of a cosmetics bag;
Tan for a lining;
lightning;
flat lock;
woven interfacing or volume interlining;
interlining.
fabric for an external part of a cosmetics bag;
Tan for a lining;
lightning;
flat lock;
woven interfacing or volume interlining;
interlining.
I used a zipper lock in size 19.5 cm. The size of the finished purse is 19.5 x 10.5 cm. As the main fabric, I used a dense cotton of two colors. The wallet can be monophonic, sewn from several fabrics, in the technique of peychvork or with decorative embroidery.
Let's start with the laziest details of the wallet. We cut out a rectangle measuring 19 cm x 88 cm from the fabric chosen for the lining. To form the inner pocket of the purse, we apply the markings to the cloth, as shown in the photo.
We start from the left to the right. At a distance of 2 cm from the edge, 8 cm, 8 cm and so on down to the bend, from the bend, we apply a mirror image.
On the lines of
marking, we bend the part alternately from ourselves and from ourselves,
as a result, we should get such a detail.
It is most convenient to start from the middle of the detail in one direction, and then repeat the same in the other direction.
It is most convenient to start from the middle of the detail in one direction, and then repeat the same in the other direction.
Sew the lining detail in the center.
At the beginning and at the end of the seam we fix.
We pass to the pocket on the moliy for a trifle. For him, we need two pieces of 15.5 cm x 17 cm in size from the fabric chosen for the lining, and a zipper.
We start sewing a zipper, fix it first on one piece of the pocket, as shown in the photo. The front side of the fabric is facing us.
We start sewing a zipper, fix it first on one piece of the pocket, as shown in the photo. The front side of the fabric is facing us.
Then we pinned the second piece of the pocket on top, facing each other, facing the wrong side of the fabric. Stitched by.
The second part of the zipper is chipped with the opposite edge of the rectangular parts of the pocket.
Stitched by.
We turn the part on the face, press the folds at the zipper.
Departing from the edge of 5 mm, we spend the detail of the pocket on the sides.
Crop the protruding edges of the zipper.
Let's move on to the details that will form the volume of the wallet. I combined 2 fabrics, lining and combined in color with the fabric of the main part.
We cut out 4 parts with a size of 8.5 cm x 15.5 cm.
We cut out 4 parts with a size of 8.5 cm x 15.5 cm.
We fold the details face to face and spread out on the larger side from above and below.
We turn it over our face, press the folds.
We turn it over our face, press the folds.
Then bend the part in half, press the fold, and bend two more times to get the letter M, as shown in the photo.
The legs of the letter M should be 1 cm longer than the middle. The same is done with the second part.
The legs of the letter M should be 1 cm longer than the middle. The same is done with the second part.
We fix the side details on the pocket on both sides. We use it, it is necessary to do the basting at the beginning and end of the line.
It turns out here is such a detail
We pass to the outer part of the wallet. I combined two tissues, but your version of the purse may be different.
The size of the main part is 19 cm x 21.5 cm. We seal the part with a woven interfacing or volume interlining of the same size.
The size of the main part is 19 cm x 21.5 cm. We seal the part with a woven interfacing or volume interlining of the same size.
We connect the inner and the main part of the purse. We
split in such a way that the detail of the "pocket-valves" maximally
rested against the fold, and from the upper edge of the purse there was
an indentation.
We apply the "pocket-valve" part to the main part from both sides.
The lateral untreated edges will be closed by a blind. For this, we cut out two parts with a size of 4 cm x 21 cm. We chip them with a purse, as shown in the photo. We put it on.
We bend to the front side, press the fold.
Using a secret seam, we sew the blind on the other side of the seam
We put on the purse a detail of the lock with a hole, we mark on the main part of the purse a place for the hole.
Cut out the hole on the marked markings.
Both parts of the lock are attached to the product using screws that come complete with a lock.
Wallet is ready!


Thank you. I'm going to try this today.
ReplyDeleteThanks for a great tutorial! I’ve wanted to try it for quite a while but finally did this morning. My wallet came out beautifully and I’m planning another.
ReplyDelete